Chapter 1: The .NET Framework
-
.NET Architecture
- .NET converts all Languages into an Intermediate Language (IL)
- CLR ( Common Language Runtime ) compiles the IL into DLL
- JIT ( Just In Time ) compiler reads local DLL and compiles it into machine code ( based on target machine type) into HTML for sending to remote client
Chapter 2: The C# Language
-
Data Types
- int
- char
- string
- bool
-
Converting and Casting Data types
- Label1.Text = System.DateTime.Now.ToString();
- bool myBoolean1 = Convert.ToBoolean(“True”); // Results in true
- bool myBoolean2 = Convert.ToBoolean(“False”); // Results in false
-
Commenting
- MSDN article on how to use commentig to create documentation automatically: http://msdn.microsoft.com/magazine/cc302121.aspx
- /*
Multiline Comment
*/ - // Single Line Comment
- /// <summary>
/// XML based multiline commenting
///<summary>
-
Assignments
- C# deals strictly with data types so...
- 14.5 is interpreted as a 'double' so to force assignment at a 'decimal' use 14.5M
- M(decimal)
- D(double)
- F(float0
- L(long)
- The following are equivalent
- !!!! FIND IN TYPECASTING!!!! decimal myDecimal = 14.5 <--ConvertToDecimal;
- decimal = 14.5M
- Use 'var' to force a particular datatype without forcing the type manually:
- var myDecimal = 14.5M // this will force 'decimal' type
-
Strings and Escaped Characters
- \” = Double Quote
- \n = New Line
- \t = Horizontal tab
- \\ = backward slash
- @ = the following lines are equivalent:
- path = @”c:\MyApp\Myfiles”;
- path = “c:\\MyApp\\Myfiles”;
-
Arrays
- Index starts at [0]
-
Single Dimensional
string[] stringArray = new string[4];
-
Two Dimensional Arrray
int[,] intArray = new int[2,4]
// Create a 4x2 array (a grid with four rows and two columns).
int[,] intArray = {{1, 2}, {3, 4}, {5, 6}, {7, 8}};
Figure 2-1 shows what this array looks like in memory.
-
Single Dimensional Array
int[] intArray = {1, 2, 3, 4};
int element = stringArray[2]; // element is now set to 3
-
Two Dimensional Array
int[,] intArray = {{1, 2}, {3, 4}, {5, 6}, {7, 8}};
// Access the value in row 0 (first row), column 1 (second column).
int element = intArray[0, 1]; // element is now set to 2.
-
ArrayList: Resizing Arrays
// Create an ArrayList object. It's a collection, not an array,
// so the syntax is slightly different.
ArrayList dynamicList = new ArrayList();
// Add several strings to the list.
// The ArrayList is not strongly typed, so you can add any data type
// although it's simplest if you store just one type of object
// in any given collection.
dynamicList.Add("one");
dynamicList.Add("two");
dynamicList.Add("three");
// Retrieve the first string. Notice that the object must be converted to a
// string, because there's no way for .NET to be certain what it is.
string item = Convert.ToString(dynamicList[0]);
-
Enumerations
While .NET uses enumeration extensively, programmers probably won't create too many variables that leverage enumeration.
Here’s an example of an enumeration that defines different types of users:
// Define an enumeration type named UserType with three possible values.
enum UserType
{
Admin, // =0
Guest, // =1
Invalid // =2
}
Now you can use the UserType enumeration as a special data type that is restricted to one of three
possible values. You assign or compare the enumerated value using the dot notation shown in the
following example:
// Create a new value and set it equal to the UserType.Admin constant.
UserType newUserType = UserType.Admin;
-
Math Operations
int number;
number = 4 + 2 * 3;
// number will be 10.
number = (4 + 2) * 3;
// number will be 18.
Table 2-2. Arithmetic Operations
Operator Description Example
+ Addition 1 + 1 = 2
– Subtraction 5 - 2 = 3
* Multiplication 2 * 5 = 10
/ Division 5.0 / 2 = 2.5
% ModulusGets 7 % 3 = 1
-
Fractional Numbers
5 / 2 = 2
5M / 2 = 2.5(decimal)
5.0 / 2 = 2.5(double)
-
Concatenation wityh '+'
myName = firstName + “ “ + lastName;
-
Shorthand Operators
myValue += 10; // myValue + 10
myValue *= 3; // myValue * 3;
-
Advanced Math
double myValue;
myValue = Math.Sqrt(81); // myValue = 9.0
myValue = Math.Round(42.889, 2); // myValue = 42.89
myValue = Math.Abs(-10); // myValue = 10.0
myValue = Math.Log(24.212); // myValue = 3.18.. (and so on)
myValue = Math.PI; // myValue = 3.14.. (and so on)
-
Type Conversions
C# allows for widening variables (int32 to in64) without any needs for special handling
Narrowing conversions must be explicit
int count32 = 1000;
short count16;
// Convert the 32-bit integer to a 16-bit integer.
// If count32 is too large to fit, .NET will discard some of the
// information you need, and the resulting number will be incorrect.
count16 = (short)count32;
If you don’t use an explicit cast when you attempt to perform a narrowing conversion, you’ll
receive an error when you try to compile your code. However, even if you perform an explicit
conversion, you could still end up with a problem. For example, consider the code shown here, which
causes an overflow:
int mySmallValue;
long myLargeValue;
myLargeValue = Int32.MaxValue;
myLargeValue++;
// This will appear to succeed (there won't be an error at runtime),
// but your data will be incorrect because mySmallValue cannot
// hold a value this large.
mySmallValue = (int)myLargeValue;
The .NET languages differ in how they handle this problem. In VB, you’ll always receive a runtime
error that you must intercept and respond to. In C#, however, you’ll simply wind up with incorrect data
in mySmallValue. To avoid this problem, you should eith er check that your data is not too large before
you attempt a narrowing conversion (which is always a good idea) or use a checked block. The checked
block enables overflow checking for a portion of code. If an overflow occurs, you’ll automatically receive
an error, just like you would in VB:
checked
{
// This will cause an exception to be thrown.
mySmallValue = (int)myLargeValue;
}
-
Convert Class (Static Method)
Strings, Dates, Numbers
string countString = "10";
// Convert the string "10" to the numeric value 10.
int count = Convert.ToInt32(countString);
// Convert the numeric value 10 into the string "10".
countString = Convert.ToString(count);
int count;
string countString = "10";
// Convert the string "10" to the numeric value 10.
count = Int32.Parse(countString);
-
ToString() Method
string myString;
int myInteger = 100;
// Convert a number to a string. myString will have the contents "100".
myString = myInteger.ToString();
-
The String Type
string myString = "This is a test string ";
myString = myString.Trim(); // = "This is a test string"
myString = myString.Substring(0, 4); // = "This"
myString = myString.ToUpper(); // = "THIS"
myString = myString.Replace("IS", "AT"); // = "THAT"
int length = myString.Length; // = 4
Type methods can be strung together:
myString = myString.Trim().Substring(0, 4).ToUpper().Replace("IS", "AT");
Or, to make life more interesting, you can use the string methods on string literals just as easily as
string variables:
myString = "hello".ToUpper(); // Sets myString to "HELLO"
|
Length |
Returns the number of characters in the string (as an integer). |
|
ToUpper() and ToLower() |
Returns a copy of the string wi th all the characters changed to uppercase or lowercase characters. |
|
Trim(), TrimEnd(), and TrimStart() |
Removes spaces or some other characters from either end (or both ends) of a string. |
|
PadLeft() and PadRight() |
Adds the specified character to the appropriate side of a string as many times as necessary to make the total length of the string equal to the number you specify. For example, "Hi".PadLeft(5, '@') returns the string @@@Hi. |
|
Insert() |
Puts another string inside a string at a specified (zero-based) index position. For example, Insert(1, "pre") adds the string pre after the first character of the current string. |
|
Remove() |
Removes a specified number of characters from a specified position. For example, Remove(0, 1) removes the first character. |
|
Replace() |
Replaces a specified substring with another string. For example, Replace("a", "b") changes all a characters in a string into b characters. |
|
Substring() |
Extracts a portion of a string of the specified length at the specified location (as a new string). For example, Substring(0, 2) retrieves the first two characters. |
|
StartsWith() and EndsWith() |
Determines whether a string starts or ends with a specified substring. For example, StartsWith("pre") will return either true or false, depending on whether the string begins with the letters pre in lowercase. |
|
IndexOf() and LastIndexOf() |
Finds the zero-based position of a substring in a string. This returns only the first match and can start at the end or beginning. You can also use overloaded versions of these methods that accept a parameter that specifies the position to start the search. |
|
Split() |
Divides a string into an array of substrings delimited by a specific substring. For example, with Split(".") you could chop a paragraph into an array of sentence strings. |
|
Join() |
Fuses an array of strings into a new string. You must also specify the separator that will be inserted between each element (or use an empty string if you don’t want any separator). |
-
DateTime
For example, the following block of code creates a DateTime object, sets it to the current date and
time, and adds a number of days. It then creates a string that indicates the year that the new date falls in
(for example, 2010).
DateTime myDate = DateTime.Now;
myDate = myDate.AddDays(100);
string dateString = myDate.Year.ToString();
The next example shows how you can use a TimeSpan object to find the total number of minutes
between two DateTime objects:
DateTime myDate1 = DateTime.Now;
DateTime myDate2 = DateTime.Now.AddHours(3000);
TimeSpan difference;
difference = myDate2.Subtract(myDate1);
double numberOfMinutes;
numberOfMinutes = difference.TotalMinutes;
The DateTime and TimeSpan classes also support the + and – arithmetic operators, which do the
same work as the built-in methods. That means you can rewrite the example shown earlier like this:
// Adding a TimeSpan to a DateTime creates a new DateTime.
DateTime myDate1 = DateTime.Now;
TimeSpan interval = TimeSpan.FromHours(3000);
DateTime myDate2 = myDate1 + interval;
// Subtracting one DateTime object from another produces a TimeSpan.
TimeSpan difference;
difference = myDate2 - myDate1;
-
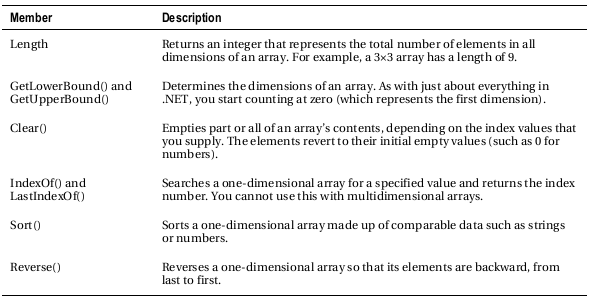
The Array Type
Every array is an instance of the System.Array type
int[] myArray = {1, 2, 3, 4, 5};
int numberOfElements;
numberOfElements = myArray.Length; // numberOfElements = 5
GetUpperBound() in action
int[] myArray = {1, 2, 3, 4, 5};
int bound;
// Zero represents the first dimension of an array.
bound = myArray.GetUpperBound(0); // bound = 4
GetUpperBound() in a two-dimensional array
// Create a 4x2 array (a grid with four rows and two columns).
int[,] intArray = {{1, 2}, {3, 4}, {5, 6}, {7, 8}};
int rows = intArray.GetUpperBound(0) + 1; // rows = 4
int columns = intArray.GetUpperBound(1) + 1; // columns = 2
-
Conditional Logic
== Equal to
!- Not equal to
< Less than
> Greater than
<= Less than or equal to
>= Greater than or equal to
&& Logical and *evaluates to true only if BOTH expressions are true)
If 1st expression is false, the second is not executed
|| Logical OR (evaluates to true if either expression is true).
If the 1st expression is true, the second is not executed.
int result;
result = String.Compare("apple", "attach"); // result = -1
result = String.Compare("apple", "all"); // result = 1
result = String.Compare("apple", "apple"); // result = 0
// Another way to perform string comparisons.
string word = "apple";
result = word.CompareTo("attach"); // result = -1
-
The if Statement
if (myNumber > 10)
{
// Do something.
}
else if (myString == "hello")
{
// Do something.
}
else
{
// Do something.
}
-
The switch Statement
Checks a single variable
Must be checking an integer-based data type, a bool, a char, a string, or a value from an enumeration
switch (myNumber)
{
case 1:
// Do something.
break;
case 2:
// Do something.
break;
default:
// Do something.
break;
}
-
Loops
-
The for Loop
- for ( init, eval, increment ) { }
- increment can be “myVar + 2”
for (int i = 0; i < 10; i++)
{
// This code executes ten times.
System.Diagnostics.Debug.Write(i);
}
-
The foreach Loop ( Read Only )
- Can't change variables in the loop, use “for” loop
string[] stringArray = {"one", "two", "three"};
foreach (string element in stringArray)
{
// This code loops three times, with the element variable set to
// "one", then "two", and then "three".
System.Diagnostics.Debug.Write(element + " ");
}
-
The while Loop
- Both types of while loop are equivalent unless the condition is FALSE to start with...
- “while” loop tests AFTER
int i = 0;
while (i < 10)
{
i += 1;
// This code executes ten times.
}
- “do while” loop tests AFTER
int i = 0;
do
{
i += 1;
// This code executes ten times.
}
while (i < 10);
-
Break and Continue
break; will exit loop immediately
continue; skips rest of loop code and re-tests condition
-
Methods
void xxxxx() returns NO DATA
int xxxxx() returns an integer
string xxxxx() returns a string
// This method doesn't return any information.
void MyMethodNoReturnedData()
{
// Code goes here.
}
// This method returns an integer.
int MyMethodReturnsData()
{
// As an example, return the number 10.
return 10;
}
-
Private vs Public Methods
Private methods only accessible locally
Public methods are accessible by all other classes
NO accessibility keyword means method is PRIVATE
private void MyMethodNoReturnedData()
{
// Code goes here.
}
Methods that don't return data can still perform assignments and manipulate objects, they just don't send anything back to the “caller”
void method types, cannot be used during a variable assignment
// This call is allowed.
MyMethodNoReturnedData();
// This call is allowed.
MyMethodReturnsData();
// This call is allowed.
int myNumber;
myNumber = MyMethodReturnsData();
// This call isn't allowed.
// MyMethodNoReturnedData() does not return any information.
myNumber = MyMethodNoReturnedData();
-
Parameters
Methods can also accept information through parameters. Parameters are declared in a similar way to
variables. By convention, parameter names always begin with a lowercase letter in any language.
Here’s how you might create a function that accep ts two parameters and returns their sum:
private int AddNumbers(int number1, int number2)
{
return number1 + number2;
}
When calling a method, you specify any required parameters in parentheses or use an empty set of
parentheses if no parameters are required:
// Call a method with no parameters.
MyMethodNoReturnedData();
// Call a method that requires two integer parameters.
MyMethodNoReturnedData2(10, 20);
// Call a method with two integer parameters and an integer return value.
int returnValue = AddNumbers(10, 10);
-
Method Overloading
Same method name, different parameters
C# supports method overloading, which allows you to create more than one method with the same name but with a different set of parameters. When you call the method, the CLR automatically chooses the correct version by examinin g the parameters you supply.
This technique allows you to collect different versions of several methods together. For example, you might allow a database search that returns an array of Product objects representing records in the database. Rather than create three methods with different names depending on the criteria, such as GetAllProducts(), GetProductsInCategory(), and GetActiveProducts(), you could create three versions of the GetProducts() method. Each method would have the same name but a different signature, meaning it would require different parameters. This example provides two overloaded versions for the GetProductPrice() method:
private decimal GetProductPrice(int ID)
{
// Code here.
}
private decimal GetProductPrice(string name)
{
// Code here.
}
// And so on...
Now you can look up product prices based on the unique product ID or the full product name, depending on whether you supply an integer or string argument:
decimal price;
// Get price by product ID (the first version).
price = GetProductPrice(1001);
// Get price by product name (the second version).
price = GetProductPrice("DVD Player");
You cannot overload a method with versions that have the same signature—that is, the same number of parameters and parameter data types—becau se the CLR will not be able to distinguish them from each other. When you call an overloaded method, the version that matches the parameter list you supply is used. If no version matches, an error occurs.
-
Optional and Named Parameters
Method overloading is a time-honored technique for making methods more flexible, so you can call them in a variety of different ways. C# 4 a dds another feature that supports the same goal: optional parameters.
An optional parameter is any parameter that has a default value. If your method has normal parameters and optional parameters, the optional parameters must be placed at the end of the parameter list. Here’s an example of a me thod that has a single optional parameter:
private string GetUserName(int ID, bool useShortForm = false)
{
// Code here.
}
Here, the useShortForm parameter is optional, which gives you two ways to call the GetUserName()
method:
// Explicitly set the useShortForm parameter.
name = GetUserName(401, true);
// Don't set the useShortForm parameter, and use the default value (false).
name = GetUserName(401);
Sometimes, you’ll have a method with multiple optional parameters, like this one:
private decimal GetSalesTotalForRegion(int regionID, decimal minSale = 0,
decimal maxSale = Decimal.MaxValue, bool includeTax = false)
{
// Code here.
}
Named Parameters
In this situation, the easiest option is to pick out the parameters you want to set by name. This feature is called named parameters, and to use it you simply add the parameter name followed by a colon (:), followed by the value, as shown here:
total = GetSalesTotalForRegion(523, maxSale: 5000 );
Overloading allows for backwards compatibility
Although you can accomplish many of the same things with optional parameters and method overloading, classes are more likely to use method overloading for two reasons. First, most of the classes in .NET were created in previous versions, when C# did not support optional parameters. Second, not all .NET language support optional parameters (although C# and VB do).
Overloading allows for either/or situations
It’s also worth noting that method overloading allows you to deal with either/or situations, while optional parameters do not. For example, the GetProductPrice() method shown in the previous section required a string or an integer. It’s not acceptable to make both of these into optional parameters, because at least one is required, and supplying the two of them at once makes no sense. Thus, this is a situation where method overloading fits more naturally.
-
Delegates
Delegates allow you to create a variable that “points” to a method. You can use this variable at any time to invoke the method. Delegates help you write flexi ble code that can be reused in many situations. They’re also the basis for events, an importan t .NET concept that you ’ll consider in the next chapter.
The first step when using a delegate is to define its signature. The signature is a combination of several pieces of information about a method: its return type, the number of parameters it has, and the data type of each parameter.
A delegate variable can point only to a method that matches its specific signature. In other words, the method must have the same retu rn type, the same number of parameters, and the same data type for each parameter as the delegate. For example, if you have a method that accepts a single string parameter and another method that accepts two string parameters, you’ll need to use a separate delegate type for each method.
To consider how this works in practice, a ssume your program has the following method:
private string TranslateEnglishToFrench(string english)
{
// Code goes here.
}
This method accepts a single string argument and re turns a string. With those two details in mind,
you can define a delegate that matches this signature. Here’s how you would do it:
private delegate string StringFunction(string inputString);
Using the StringFunction delegate type, you could create a delegate variable like this:
StringFunction functionReference;
Once you have a delegate variable, the fun begins. Using your delegate variable, you can point to any method that has the matching signature. In this example, the StringFunction delegate type requires one string parameter and returns a string. Thus, you can use the functionReference variable to store a reference to the TranslateEnglishToFrench() method you saw earlier. Here’s how to do it:
functionReference = TranslateEnglishToFrench;
Now the delegate 'functionReference' will translate “Hello” to “Bonjour”
string frenchString;
frenchString = functionReference("Hello");
The following code shows all these steps—creating a delegate variable, assigning a method, and calling the method —from start to finish:
// Create a delegate variable.
StringFunction functionReference;
// Store a reference to a matching method in the delegate.
functionReference = TranslateEnglishToFrench;
// Run the method that functionReference points to.
// In this case, it will be TranslateEnglishToFrench().
string frenchString = functionReference("Hello");
Chapter 3: Types, Objects and Namespaces
-
Basics About Classes
Class is the definition
Instances are copies of a class
Instances of a Class or Objects
-
Members
Classes interact with each other with the help of three key ingredients:
• Properties: Properties allow you to access an object’s data. Some properties may be read-only, so they cannot be modified, while others can be changed. For example, the previous chapter demonstrated how you can use the read-only Length property of a String object to find out how many letters are in a string.
• Methods: Methods allow you to perform an action on an object. Unlike properties, methods are used for actions that perform a distinct task or may change the object’s state significantly. For example, to open a connection to a database, you might call an Open() method in a Connection object.
• Events : Events provide notification that something has happened. If you’ve ever programmed a modern Windows application, you know how controls can fire events to trigger your code. For example, if a user clicks a button, the Button object fires a Click event, which your code can react to. ASP.NET controls also provide events.
-
Static & Instance Members
.Static
.Instance();
One of the tricks about .NET classes is that you r eally use them in two ways. You can use some class members without creating an object first. These are called static members, and they’re accessed by class name. For example, you can use the static property DateTime. Now to retrieve a DateTime object that represents the current date and time. You do n’t need to create a DateTime object first.
On the other hand, the majority of the DateTime members require a valid instance. For example, you can’t use the AddDays() method or the Hour property without a valid object. These instance members have no meaning without a live object and some valid data to draw on. The following code snippet uses static and instance members:
// Get the current date using a static property.
// Note that you need to use the class name DateTime.
DateTime myDate = DateTime.Now;
// Use an instance method to add a day.
// Note that you need to use the object name myDate.
myDate = myDate.AddDays(1);
// The following code makes no sense.
// It tries to use the instance method AddDays() with the class name DateTime!
myDate = DateTime.AddDays(1);
Both properties and methods can be designated as static. Static properties and methods are a major part of the .NET Framework, and you will use them frequently in this book. Some classes may consist entirely of static members (such as the Math class shown in the previous chapter), and some may use only instance members. Other classes, like DateTime, provide a combination of the two. The next example, which introduces a basic class, will use only instance members. This is the most common design and a good starting point.
-
A Simple Class
public class MyClass
{
// Class code goes here.
}
You can define as many classes as you need in the same file. However, good coding practices suggest that in most cases you use a single file for each class. Classes exist in many forms. They may represent an actual thing in the real world (as they do in most programming textbooks), they may represent some programming abstraction (such as a rectangle or color structure), or they may just be a convenient way to group related functionality (like with the Math class). Deciding what a class should represent and breaking down your code into a group of interrelated classes are part of the art of programming.
-
Building a Classic Class
Class definition with 3 member variables which can be used by ALL methods in the class.
Public class Product
{
private string name;
private decimal price;
private string imageUrl;
{
-
Accessibility Keywords ( variables, methods, properties, events )
public accessed by any class
PublicFunction casing convention
private accessed only by members inside the current class
privateFunction casing convention
_privateFunction
m_privateFunction
internal accessed by members in any of the classes in the current assembly (the file with compiled code)
protected accessed by members in the current class or in any class that inherits from this class
protected internal accessed by members in the current application ( as with internal) and by the members in any class that inherits from this class
-
Creating an Object
//new creates an instance of the Product() object
Product saleProduct = new Product();
// Optionally you could do this in two steps:
// Product saleProduct; //declare
// saleProduct = new Product(); //instantiate
// Now release the object from memory.
saleProduct = null;
-
Declare vs Instantiate
// Declare but don't create the product.
Product saleProduct;
// Call a function that accepts a numeric product ID parameter,
// and returns a product object.
// Now it is instantiated
saleProduct = FetchProduct(23);
Once you understand the concept, you can compress this code into one statement:
Product saleProduct = FetchProduct(23);
In these cases, when you aren’t actually creating an object, you shouldn’t use the new keyword.
-
Adding Properties
Property Accessors usually have two parts:
- get to retrieve object's data
- set to set object's data
- Note In your property setter, you access the value that’s being applied using the value keyword. Essentially, value is a parameter that’s passed to your property setting code automatically.
- myProduct.Name = “Skittles” > assigns “Skittles” to the “value” parameter which passes it to private “name” variable
public class Product
{
private string name;
private decimal price;
private string imageUrl;
public string Name
{
get
{
return name;
}
set
{
name = value;
}
}
public decimal Price
{
get
{
return price;
}
set
{
price = value;
}
}
public string ImageUrl
{
get
{
return imageUrl;
}
set
{
imageUrl = value;
}
}
}
Now object can be created and configured using Name, Price, ImageUrl (public Properties)
Product saleProduct = new Product();
saleProduct.Name = "Kitchen Garbage";
saleProduct.Price = 49.99M;
saleProduct.ImageUrl = "http://mysite/garbage.png";
- Usually, property accessors come in pairs—that is, every property has both a get accessor and a set accessor. But this isn’t always the case. You can create properties that can be read but not set (which are called read-only properties), and you can create properties that can be set but not retrieved (called write-only properties). All you need to do is leave out the accessor that you don’t need. Here’s an example of a read-only property:
public decimal Price
{
get
{
return price;
}
}
- This technique is particularly handy if you want to create properties that don’t correspond directly to a private member variable. For example, you might want to use properties that represent calculated values or use properties that are based on other properties.
-
Automatic Properties
- If you have really simple properties—properties that do nothing except set or get the value of a private member variable—you can simplify your code using a C# language feature called automatic properties.
- Automatic properties are properties without any code. When you use an automatic property, you declare it, but you don’t supply the code for the get and set accessors, and you don’t declare the matching private variable. Instead, the C# compiler adds these details for you.
- Because the properties in the Product class simply get and set member variables, you can replace any of them (or all of them) with automatic properties. Here’s an example:
public decimal Price
{
get;
set;
}
- You don’t actually know what name the C# compiler will choose when it creates the corresponding private member variable. However, it doesn’t matter, because you’ll never need to access the private member variable directly. Instead, you’ll always use the public Price property.
- For even more space savings, you can compress the declaration of an automatic property to a single line. Here’s a complete, condensed Product class that uses this technique:
public class Product
{
public string Name { get; set; }
public decimal Price { get; set; }
public string ImageUrl { get; set; }
}
- The only disadvantage to automatic properties is that you’ll need to switch them back to normal properties if you want to add some more specialized code after the fact. For example, you might want to add code that performs validation or raises an event when a property is set.
-
Adding a Method
public class Product
{
// (Additional class code omitted for clarity.)
public string GetHtml()
{
string htmlString;
htmlString = "<h1>" + name + "</h1><br />";
htmlString += "<h3>Costs: " + Price.ToString() + "</h3><br />";
htmlString += "<img src='" + imageUrl + "' />";
return htmlString;
}
}
-
Adding a Constructor
- Currently, the Product class has a problem. Ideally, classes should ensure that they are always in a valid state. However, unless you explicitly set all the appropriate properties, the Product object won’t correspond to a valid product. This could cause an error if you try to use a method that relies on some of the data that hasn’t been supplied. To solve this problem, you need to equip your class with one or more constructors .
- A constructor is a method that automatically runs when the class is first created. In C#, the constructor always has the same name as the name of the class. Unlike a normal method, the constructor doesn’t define any return type, not even void.
- The next code example shows a new version of the Product class. It adds a constructor that requires the product price and name as arguments:
public class Product
{
// (Additional class code omitted for clarity.)
public Product(string name, decimal price)
{
// Set two properties in the class.
Name = name;
Price = price;
}
}
- Here’s an example of the code you need to create an object based on the new Product class, using its constructor:
Product saleProduct = new Product("Kitchen Garbage", 49.99M);
- The preceding code is much leaner than the code that was required to create and initialize the previous version of the Product class. With the help of the constructor, you can create a Product object and configure it with the basic data it needs in a single line.
- If you don’t create a constructor, .NET supplies a default public constructor that does nothing. If you create at least one constructor, .NET will not supply a default constructor. Thus, in the preceding example, the Product class has exactly one constructor, which is the one that i s explicitly defined in code. To create a Product object, you must use this constructor. This restriction prevents a client from creating an object without specifying the bare minimum amount of data that’s required:
// This will not be allowed, because there is
// no zero-argument constructor.
Product saleProduct = new Product();
- Note To create an instance of a class, you need to use a constructor. The preceding code fails because it attempts to use a zero-argument constructor , which doesn’t exist in the Product class.
- Most of the classes you use will have constructors that require parameters. As with ordinary methods, constructors can be overloaded with multiple versions, each providing a different set of parameters.
public class Product
{
// (Additional class code omitted for clarity.)
public Product(string name, decimal price)
{
Name = name;
Price = price;
}
public Product(string name, decimal price, string imageUrl)
{
Name = name;
Price = price;
ImageUrl = imageUrl;
}
}
- When creating an object, you can choose the constructor that suits you best based on the information that you have available. The .NET Framework classes use overloaded constructors extensively.
Instantiating a new Object with Object Initializers creates a new list of parameters without needing a specific constructor
Person myPerson = new Person() { FirstName = “Imar”, LastName = “Spaanjaars” };
-
Adding an Event
- Classes can also use events to notify your code. To define an event in C#, you must first create a delegate that defines the signature for the event you’re going to use. Then you can define an event based on that delegate using the event keyword. As with properties a nd methods, events can be declared with different accessibilities, although public events are the default. Usually, this is what you want, because you’ll use the events to allow one object to notify another object that’s an instance of a different class.
- As an illustration, the Product class example has been enhanced with a PriceChanged event that occurs whenever the price is modified through the Price property procedure. This event won’t fire if code inside the class changes the underlying private price variable without going through the property procedure:
// Define the delegate that represents the event.
public delegate void PriceChangedEventHandler();
public class Product
{
// (Additional class code omitted for clarity.)
// Define the event using the delegate.
public event PriceChangedEventHandler PriceChanged;
public decimal Price
{
get
{
return price;
}
set
{
price = value;
// Fire the event, provided there is at least one listener.
if (PriceChanged != null)
{
PriceChanged();
}
}
}
}
To fire an event, you just call it by name. However, before firing an event, you must check that at least one subscriber exists by testing whether the event reference is null. If it isn’t null, it’s safe to fire the event.
It’s quite possible that you’ll create dozens of ASP. NET applications without once defining a custom event. However, you’ll be hard-pressed to write a single ASP.NET web page without handling an event. To handle an event, you first create a method called an event handler. The event handler contains the code that should be executed when the event occurs . Then, you connect the event handler to the event. To handle the Product.PriceChanged event, you n eed to begin by creating an event handler, which you’ll usually place in another class. The event handler needs to have the same signature as the event it’s handling. In the Product example, the PriceChanged event has no parameters, so the event handler would look like the simple method shown here:
public void ChangeDetected()
{
// This code executes in response to the PriceChanged event.
}
- The next step is to hook up the event handler to th e event. To do this, you use a simple assignment statement that sets the event (PriceChanged) to the event handling method (ChangeDetected) using the += operator:
Product saleProduct = new Product("Kitchen Garbage", 49.99M);
// This connects the saleProduct.PriceChanged event to an event handling
// procedure called ChangeDetected.
// Note that ChangedDetected needs to match the PriceChangedEventHandler
// delegate.
saleProduct.PriceChanged += ChangeDetected;
// Now the event will occur in response to this code:
saleProduct.Price = saleProduct.Price * 2;
- This code attaches an event handler to a method named ChangeDetected. This method is in the same class as the event hookup code shown here, and for that reason you don’t need to specify the object name when you attach the event handler. If you want to connect an event to a different object, you’d need to use the dot syntax when re ferring the event handler method, as in myObject.ChangeDetected.
- It’s worth noting that if you’re using Visual Studio, you won’t need to manually hook up event handlers for web controls at all. Instead, Visual Studio can add the code you need to connect all the event handlers you create.
- ASP.NET uses an event-driven programming model, so you’ll soon become used to writing code that reacts to events. But unless you’re creating your own components, you won’t need to fire your own custom events. For an example where custom events make sense, refer to Chapter 11, which discusses how you can add an event to a user control you’ve created.
■ Tip You can also detach an event handler using the -= operator instead of +=.
-
Testing the Product Class
- Log in to post comments