Installation
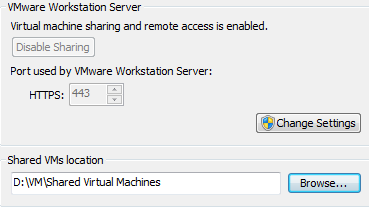
- Install App
- HTTPS: 443 (might want to change)
- Run <k>
- MA0QY-4415K-FZ2A9-VU9Q0-9A7HM
- Install Acronis True Backup (For TIBs)
- Shrink system footprint
- Disable Restore Points
- Disable Hibernation
- Move pagefile to D:
- Install VMWare Workstation 9
- Create Win7 VMs
- Setup Network Environment
- Test Inet
- Test access to LAN Systems
- Create folder shares
- Install XAMPP & config server specifics

Shrink System Footprint
Disable System Restore


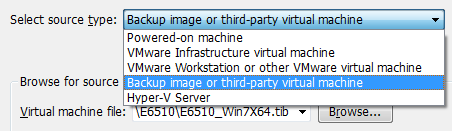
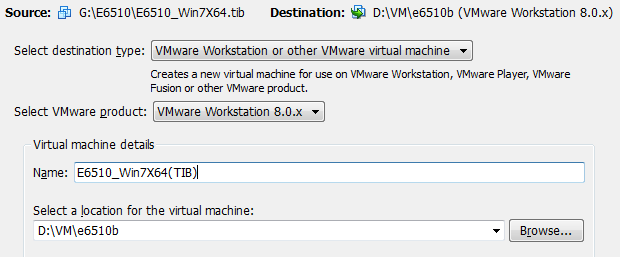
Creating VM from TIB file:
Source Image Settings

Source Image Settings Options
Source Image Details

Destination Details
Devices

Memory Allocation

Summary

VMWare vCenter Converter Standalone

Setting up Virtual Network for VMs
- Both products, VMware Server and VMware Player offer ten virtual net-works on Microsoft Windows (on Linux there are about 100), three of which have already been preconfigured during the installation:
- Host-only, Bridged and NAT. Yet: via the GUI, VMnet0 can only be used for a bridged network; VMnet1 can only be used for Host-only; and VMnet8 only for a NAT network
- The seven remaining networks are defined as Guest-only by default, which means that only the virtual machines are connected over the network. The host, by comparison, remains on the Host-only network, and has no con-nection to the Guest-only network.
- If you install a further virtual network adapter on the host and allocate this to a Guest-only network, then this network will become a Host-only network, because then the host and all VMs can see each other. On Windows and on most Linux derivatives these Guest-only networks are directly available. However on systems with UDEV devices, such as newer SuSE and Ubuntu versions, device nodes for VMnet must be created

- VM1 is an internal server system, which should be reachable from every member of the network. So, it only has an adapter to VMnet0.
- VM2 should likewise be reachable in the network, but additionally have a connection to VM4 over the separate Guest-only network VMnet3.
- VM3 needs connection to VM4 and to the host system, as these three systems exchange data with one an other. Therefore only a Host-only network connection (VMnet1) is required.
- VM4 is a system with various different applications and must therefore have a dedicated connection to VM2 (VMnet3), a separate connection to the host and VM3 (VMnet1), as well as an Internet connection. As there is no reason for a connection from the physical network to VM4, a NAT network (VMnet8) is ideal for this purpose.

VM with Internet Access
VMnet1(Host) & VMnet8(NAT)
VMnet1 Settings


VMnet1(Host) & VMnet8(Bridged)
- Internet Access
- LAN Access
VMnet1

VMnet8

Windows Network

Setting up the Web Server ( XAMPP )

- Copy XAMPP directory in its entirety
- Edit httpd.conf
- Set Apache Server path

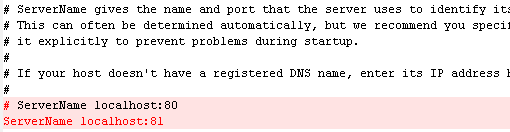
- Listen 81

- Set ServerName localhost:81
- Set Document Root

- Set Directory for htdocs (a.k.a. point to site’s root )

- httpd-xampp.conf
#
# New XAMPP security concept
#
<LocationMatch "^/(?i:(?:xampp|security|licenses|phpmyadmin|webalizer|server-status|server-info))">
Order deny,allow
Deny from all
Allow from ::1 127.0.0.0/8 \
fc00::/7 10.0.0.0/8 172.16.0.0/12 192.168.0.0/16 \
fe80::/10 169.254.0.0/16
ErrorDocument 403 /error/XAMPP_FORBIDDEN.html.var
</LocationMatch>
- Run setup_xampp.bat
- This will re-write all the server config files to utilize D:\xampp\apache\bin\httpd.exe
- Run xampp-control.exe
XAMPP Control Panel
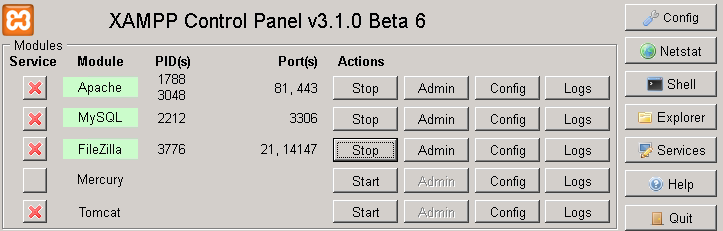
XAMPP Config and Logs
Apache\Config
|
Apache\Logs
|
MySQL\Config
|
MySQL\Logs
|
FileZilla\Config
|
Mercury\Config
|
Tomcat\Config
|
|


Windows Firewall
Control Panel\All Control Panel Items\Windows Firewall
- Turn off the Firewall until you get a response from apache

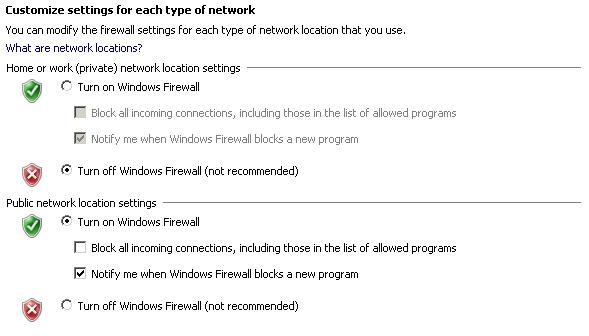
- Once a response is received, enable the Firewall for Public and Private networks
- Allow a program or feature through Windows Firewall…

- Control Panel\All Control Panel Items\Windows Firewall\Allowed Programs

Control Panel\All Control Panel Items\Windows Firewall\Allowed Programs
- Allow Apache HTTP Server on Home/Work and/or Public networks
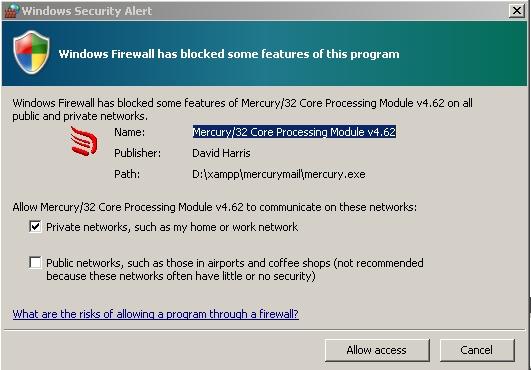
- When starting


- When starting Apache or FileZillaFTP, Windows may prompt to allow the program through the Firewall

- To make the setting manually, click ‘Allow another program…
- Browse to xampp\filezillftp\filezillaserver.exe
- Enable for the appropriate networks

- Browsing to the FileZillaServer file

- Windows Firewall > Advanced Settings > Inbound Rules


FileZilla
- Use PC name as ‘host’

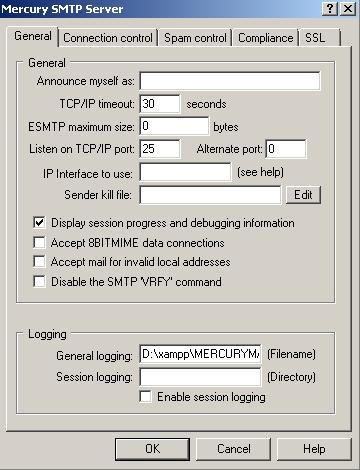
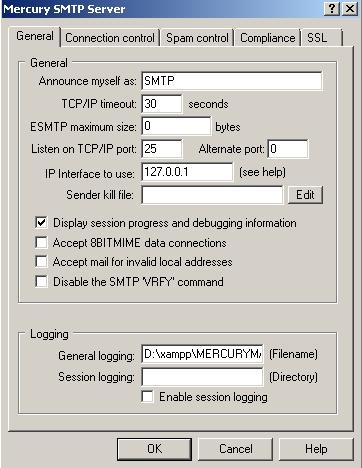
Setup SMTP Server (Mercury)
- Assign DNS Servers for NIC
- 68.94.156.1
- 68.94.157.1


- Start Mercury
- Windows will prompt for Firewall Blocking
Configure Protocols
- Disable all but two protocols
- Mercury SMTP Server
- Mercury SMTP Relay Client


- Configuration > Mercury core Module > General Tab
- Internet name for this system: localhost
- Disable all but “send copies of all errors to postmaster”
- Check tab “Local Domains” make sure localhost is there
- Close and Save


Edit MercuryS SMTP Server
- Open Configuration > MercuryS SMTP Server > General Tab
- Name = SMTP
- Port 25
- IP Interface = 127.0.01
- Go to Connection Control TAB and add 127.0.0.1 to the list
- Un-check “do not permit SMTP relaying to non-local mail:
- Close and Save


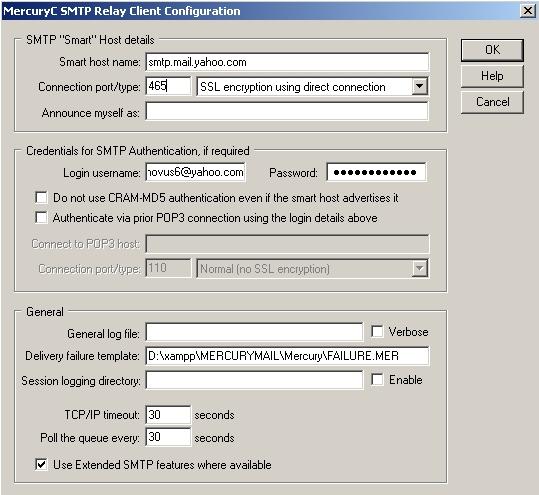
Edit MercuryC SMTP Client
- Open Configuration > MercuryC SMTP Client
- Enter in external SMTP client (smtp.google.com for example) on port 465 with SSL ( or whatever ports are supported )
- Enter your login name and password to that external SMTP server
- novus6 / admin
- Close and Save

Edit PHP.INI
- Add “sendmail_from=postmaster@localhost”
- Stop and Restore Mercury and Apache
feedback.php Form
<html>
<head>
<title>Basic2</title>
</head>
<body>
<form method="post" action="sendmail.php">
Email2: <input name="email" type="text" />
Message:
<textarea name="message" rows="10" cols="30">
</textarea>
<input type="submit" />
</form>
</body>
</html>
sendmail.php
<?php
$email = $_GET['email'] ;
$message = $_GET['message'] ;
mail( "yourname@example.com", "Email Subject", $message, "From: $email" );
print "Congratulations your email has been sent";
?>
Mercury Error Codes
by max11max » 31. July 2006 20:52

rh+
I suggest you check out the data you are sending to the mail server.
You might find the below handy,
max
http://indigo.ie/~mavjop/rfcs/rfc821.html
4.2.1. REPLY CODES BY FUNCTION GROUPS
500 Syntax error, command unrecognized
[This may include errors such as command line too long]
501 Syntax error in parameters or arguments
502 Command not implemented
503 Bad sequence of commands
504 Command parameter not implemented
211 System status, or system help reply
214 Help message
[Information on how to use the receiver or the meaning of a
particular non-standard command; this reply is useful only
to the human user]
220 <domain> Service ready
221 <domain> Service closing transmission channel
421 <domain> Service not available,
closing transmission channel
[This may be a reply to any command if the service knows it
must shut down]
250 Requested mail action okay, completed
251 User not local; will forward to <forward-path>
450 Requested mail action not taken: mailbox unavailable
[E.g., mailbox busy]
550 Requested action not taken: mailbox unavailable
[E.g., mailbox not found, no access]
451 Requested action aborted: error in processing
551 User not local; please try <forward-path>
452 Requested action not taken: insufficient system storage
552 Requested mail action aborted: exceeded storage allocation
553 Requested action not taken: mailbox name not allowed
[E.g., mailbox syntax incorrect]
354 Start mail input; end with <CRLF>.<CRLF>
554 Transaction failed
Apache jsp server ( Tomcat )
Note: Had to change port# from 8080 to 8081 with VisualSVN running
\xampp\tomcat\conf\server.xml:
<Connector port="8081" protocol="HTTP/1.1"
connectionTimeout="20000"
redirectPort="8443" />

Environment Variables ( Source: RUNNING.txt)
3) Configure Environment Variables
Tomcat is a Java application and does not use environment variables. The
variables are used by the Tomcat startup scripts. The scripts use the variables
to prepare the command that starts Tomcat.
(3.1) Set CATALINA_HOME (required) and CATALINA_BASE (optional)
The CATALINA_HOME and CATALINA_BASE environment variables are used to
specify the location of Apache Tomcat and the location of its active
configuration, respectively.
The CATALINA_HOME environment variable should be set as defined in (2.2)
above. The Tomcat startup scripts have some logic to set this variable
automatically if it is absent (based on the location of the script in
Unixes and on the current directory in Windows), but this logic might not work
in all circumstances.
The CATALINA_BASE environment variable is optional and is further described
in the "Multiple Tomcat Instances" section below. If it is absent, it defaults
to be equal to CATALINA_HOME.
(3.2) Set JRE_HOME or JAVA_HOME (required)
The JRE_HOME variable is used to specify location of a JRE that is used to
start Tomcat.
The JAVA_HOME variable is used to specify location of a JDK. It is used instead
of JRE_HOME.
Using JAVA_HOME provides access to certain additional startup options that
are not allowed when JRE_HOME is used.
If both JRE_HOME and JAVA_HOME are specified, JRE_HOME is used.
‘JAVA_HOME’ Environment Variable
setclasspath.bat
This file will check for presence of JAVA_HOME environment variable and, if found, will check for 4 files in the path ‘%JAVA_HOME%\bin\’
Here’s the initial discovery routine
:needJavaHome
rem Check if we have a usable JDK
if "%JAVA_HOME%" == "" goto noJavaHome
if not exist "%JAVA_HOME%\bin\java.exe" goto noJavaHome
if not exist "%JAVA_HOME%\bin\javaw.exe" goto noJavaHome
if not exist "%JAVA_HOME%\bin\jdb.exe" goto noJavaHome
if not exist "%JAVA_HOME%\bin\javac.exe" goto noJavaHome
set "JRE_HOME=%JAVA_HOME%"
CATALINA_OPTS
set CATALINA_OPTS=-Xms256m -Xmx512m
CATALINA_OPTS or JAVA_OPTS?
|
CATALINA_OPTS is used to control Tomcat environment options, whereas JAVA_OPTS controls the environment options at a higher level ie. for any Java library. You can start Tomcat with more heap memory using the following: On Windows For example if you want to allocate a minimum heap size of 256MB and a max heap size of 512MB you will have to write the following on Windows: The line you add should go just before the line starting call “%EXECUTABLE%”… If you are running tomcat 5.5 via tomcat.exe, you can update the heap size by running tomcatw.exe and setting the required values via the Java tab. On Linux The line you add should go just before the line starting exec “$PRGDIR… Permanent Generation Size If you get the error message: java.lang.OutOfMemoryError: PermGen space you need to add the argument -XX:MaxPermSize=128m to CATALINA_OPTS, in addition to any argument you use to set the heap size. |
‘CATALINA_HOME’ Environment Variable
This is used by the scripts to locate critical components and CAN’T be hard-coded
Setting the Environment Variables


JDK/JRE Installation
- Copied JRE6 to D:\xampp\jre6
- Set JAVA_HOME to same path
- TomCat was failing due to inability to discover JDK/JRE
- Installed ‘jdk-6u43-windows-i586.exe’
- Set JAVA_HOME to ‘C:\Program Files (x86)\Java\jdk1.6.0_43 \’
After installing LoadUI, now TomCat won’t load due to JDK/JRE conflicts…need to check registry settings
TomCat Error when JDK/JRE can’t be found in the registry
11:04:28 PM [Tomcat] Attempting to start Tomcat app...
11:04:28 PM [Tomcat] Tomcat Started/Stopped with errors, return code: 1
11:04:28 PM [Tomcat] Make sure you have Java JDK or JRE installed and the required ports are free
11:04:28 PM [Tomcat] Check the "/xampp/tomcat/logs" folder for more information
After installing JDK6, it successfully started:
11:17:56 PM [Tomcat] Attempting to start Tomcat app...
11:17:58 PM [Tomcat] Status change detected: running
11:25:05 PM [mysql] Attempting to start MySQL app...
11:25:05 PM [filezilla] Attempting to start FileZilla app...
11:25:06 PM [filezilla] Status change detected: running
11:25:07 PM [mysql] Status change detected: running
catalina_start.bat output
[XAMPP]: Searching for JDK or JRE HOME with reg query ...
ERROR: The system was unable to find the specified registry key or value.
. [XAMPP]: Could not find 32 bit or 64 bit JDK
. [XAMPP]: Looking for 32 bit JDK on 64 bit machine
HKEY_LOCAL_MACHINE\SOFTWARE\Wow6432Node\JavaSoft\Java Development Kit
CurrentVersion REG_SZ 1.6
HKEY_LOCAL_MACHINE\SOFTWARE\Wow6432Node\JavaSoft\Java Development Kit\1.6
JavaHome REG_SZ C:\Program Files (x86)\Java\jdk1.6.0_43
MicroVersion REG_SZ 0
HKEY_LOCAL_MACHINE\SOFTWARE\Wow6432Node\JavaSoft\Java Development Kit\1.6.0_43
JavaHome REG_SZ C:\Program Files (x86)\Java\jdk1.6.0_43
MicroVersion REG_SZ 0
[XAMPP]: Using JDK
[XAMPP]: Seems fine!
[XAMPP]: Set JAVA_HOME : C:\Program Files (x86)\Java\jdk1.6.0_43
[XAMPP]: Set CATALINA_HOME : D:\xampp\tomcat
Using CATALINA_BASE: "D:\xampp\tomcat"
Using CATALINA_HOME: "D:\xampp\tomcat"
Using CATALINA_TMPDIR: "D:\xampp\tomcat\temp"
Using JRE_HOME: "C:\Program Files (x86)\Java\jdk1.6.0_43"
Using CLASSPATH: "D:\xampp\tomcat\bin\bootstrap.jar;D:\xampp\tomcat\bin\to
mcat-juli.jar"
Jun 3, 2012 11:17:57 PM org.apache.catalina.core.AprLifecycleListener init
INFO: The APR based Apache Tomcat Native library which allows optimal performanc
e in production environments was not found on the java.library.path: C:\Program
Files (x86)\Java\jdk1.6.0_43\bin;C:\Windows\Sun\Java\bin;C:\Windows\system32;C:\
Windows;C:\Windows\system32;C:\Windows;C:\Windows\System32\Wbem;C:\Windows\Syste
m32\WindowsPowerShell\v1.0\;.
Jun 3, 2012 11:17:57 PM org.apache.coyote.AbstractProtocol init
INFO: Initializing ProtocolHandler ["http-bio-8080"]
Jun 3, 2012 11:17:57 PM org.apache.coyote.AbstractProtocol init
INFO: Initializing ProtocolHandler ["ajp-bio-8009"]
Jun 3, 2012 11:17:57 PM org.apache.catalina.startup.Catalina load
INFO: Initialization processed in 484 ms
Jun 3, 2012 11:17:57 PM org.apache.catalina.core.StandardService startInternal
INFO: Starting service Catalina
Jun 3, 2012 11:17:57 PM org.apache.catalina.core.StandardEngine startInternal
INFO: Starting Servlet Engine: Apache Tomcat/7.0.30
Jun 3, 2012 11:17:58 PM org.apache.catalina.startup.HostConfig deployDirectory
INFO: Deploying web application directory D:\xampp\tomcat\webapps\docs
Jun 3, 2012 11:17:58 PM org.apache.catalina.startup.HostConfig deployDirectory
INFO: Deploying web application directory D:\xampp\tomcat\webapps\examples
Jun 3, 2012 11:17:58 PM org.apache.catalina.startup.HostConfig deployDirectory
INFO: Deploying web application directory D:\xampp\tomcat\webapps\host-manager
Jun 3, 2012 11:17:58 PM org.apache.catalina.startup.HostConfig deployDirectory
INFO: Deploying web application directory D:\xampp\tomcat\webapps\manager
Jun 3, 2012 11:17:58 PM org.apache.catalina.startup.HostConfig deployDirectory
INFO: Deploying web application directory D:\xampp\tomcat\webapps\ROOT
Jun 3, 2012 11:17:58 PM org.apache.coyote.AbstractProtocol start
INFO: Starting ProtocolHandler ["http-bio-8080"]
Jun 3, 2012 11:17:58 PM org.apache.coyote.AbstractProtocol start
INFO: Starting ProtocolHandler ["ajp-bio-8009"]
Jun 3, 2012 11:17:58 PM org.apache.catalina.startup.Catalina start
INFO: Server startup in 623 ms

JAVA & ECLIPSE IDE ( Java Programming )
- Start Eclipse with a similar script, with the JAVA_HOME environment variable present
@echo off
set DEV_HOME=D:\devl\Java
set JAVA_HOME=%DEV_HOME%\java32\jdk1.6.0_33\jre
set PATH=%JAVA_HOME%\bin;%PATH%
start %DEV_HOME%\eclipse\eclipse.exe -vm %JAVA_HOME%\bin\javaw.exe -showlocation -vmargs -server -Xms512m -Xmx1024m -XX:MaxPermSize=128m
Hudson Installation under Tomcat
Copy hudson.war to necessary locations
Copy hudson.war to \xampp\Hudson
Copy hudson.war to \xampp\tomcat\webapps\
tomcat will automatically unpack and implement the application
Create a \hudson\hudson_start.cmd
Use this to test the Hudson installation and to verify it can start successfully
set DEV_HOME=D:\Java
set JAVA_HOME=%DEV_HOME%\java32\jdk6
set PATH=%JAVA_HOME%\bin;%PATH%
java -jar hudson.war
TomCat\bin\setenv.bat
Once Hudson is working on its own, add it to tomcat and create an environment variable for HUDSON_HOME
catalina.bat will seek and run setenv.bat if it exists.
set CATALINA_OPTS=-DHUDSON_HOME=D:\xampp\hudson\.hudson -Xms256m -Xmx512m -XX:MaxPermSize=128m
Change tomcat-users.xml so ‘tomcat’ user can access the GUI
<role rolename="tomcat"/>
<user username="tomcat" password="tomcat" roles="standard,manager,manager-gui"/>
Hudson listens on port 49198

INFO: Attained Finalizing set up
Apr 5, 2013 1:04:10 AM hudson.model.Hudson$5 onAttained
INFO: Completed initialization
Apr 5, 2013 1:04:10 AM hudson.TcpSlaveAgentListener <init>
INFO: JNLP slave agent listener started on TCP port 49198
Apr 5, 2013 1:04:19 AM com.sun.jersey.server.impl.application.WebApplicationImpl _initiate
Jenkins
tomcat\bin\setenv.bat
set JENKINS_HOME=D:\xampp\jenkins\jenkins
|
To run Jenkins, minimally you need to have JRE 1.5 or later. After you download jenkins.war, you can launch it by executing java -jar jenkins.war. This is basically the same set up as the test drive, except that the output will go to console, not to a window. Alternatively, if you have a servlet container that supports Servlet 2.4/JSP 2.0 or later, such as Glassfish, Tomcat 5, JBoss, Jetty 6, etc., then you can deploy jenkins.war as you would any WAR file. See this document for more about container-specific installation instruction. Once the war file is exploded, run chmod 755 jenkins in the exploded jenkins/WEB-INF directory so that you can execute this shell script. If you're running on Windows you might want to run Jenkins as a service so it starts up automatically without requiring a user to log in. The easiest way to achieve this is to simply download and install Jenkins via the native Windows installer, which can be found on the Jenkins main page. Just download the .zip file, unpack it, and click through the install wizard. The wizard both installs Jenkins and sets up the Jenkins Windows service for you. Another way to run Jenkins as a service is to first install Tomcat as a service and then deploy Jenkins to it in the usual way. Another way is to use the Java Service Wrapper. However, there may be problems using the service wrapper, because the Main class in Jenkins in the default namespace conflicts with the service wrapper main class. Deploying inside a service container (Tomcat, Jetty, etc.) is probably more straightforward, even for developers without experience with such containers.
|
Maven Installation
Maven Download and Installation
Download apache-maven-3.0.5
Copy to \xampp\maven\apache-maven-3.0.5
Update ‘\\e6510vm\xampp\maven\apache-maven-3.0.5\conf\settings.xml’ for the localRepository currently at ‘\xampp\maven\repo
<localRepository>\\e6510vm\xampp\maven\repo</localRepository>
Standalone Installation Notes ( under \xampp\maven )
|
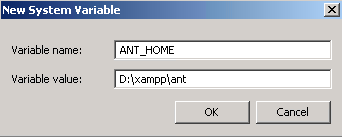
Environment Variables
ANT_HOME=D:\xampp\ant
CATALINA_HOME=D:\xampp\tomcat
JAVA_HOME=C:\Program Files (x86)\Java\jdk1.6.0_43\jre
M2=D:\xampp\maven\apache-maven-3.0.5\bin
M2_HOME=D:\xampp\maven\apache-maven-3.0.5
MAVEN_OPTS=-Xms256m -Xmx512m
Path=C:\Windows\system32;C:\Windows;C:\Windows\System32\Wbem;C:\Windows\System32
\WindowsPowerShell\v1.0\;C:\Program Files\TortoiseSVN\bin;D:\xampp\maven\apache-
maven-3.0.5\bin
Testing Maven Installation and Version
C:\Users\Setup>mvn --version
Apache Maven 3.0.5 (r01de14724cdef164cd33c7c8c2fe155faf9602da; 2013-02-19 07:51:
28-0600)
Maven home: D:\xampp\maven\apache-maven-3.0.5
Java version: 1.6.0_43, vendor: Sun Microsystems Inc.
Java home: C:\Program Files (x86)\Java\jdk1.6.0_43\jre
Default locale: en_US, platform encoding: Cp1252
Create a repository
D:\xampp\maven\repo
Configure Maven for the repo folder
\xampp\maven\apache-maven-3.0.5\conf\settings.xml
<localRepository>/maven/repo</localRepository>
Creating a Project with Maven
Open a command prompt
CD to D:\maven\repo
C:>mvn archetype:generate -DgroupId=com.mycompany.app -DartifactId=my-app -DarchetypeArtifactId=maven-archetype-quickstart -DinteractiveMode=false
POM.XML
The pom.xml file is the core of a project's configuration in Maven. It is a single configuration file that contains the majority of information required to build a project in just the way you want. The POM is huge and can be daunting in its complexity, but it is not necessary to understand all of the intricacies just yet to use it effectively. This project's POM is:
<project xmlns="http://maven.apache.org/POM/4.0.0" xmlns:xsi="http://www.w3.org/2001/XMLSchema-instance"
xsi:schemaLocation="http://maven.apache.org/POM/4.0.0 http://maven.apache.org/xsd/maven-4.0.0.xsd">
<modelVersion>4.0.0</modelVersion>
<groupId>com.mycompany.app</groupId>
<artifactId>my-app</artifactId>
<version>1.0-SNAPSHOT</version>
<packaging>jar</packaging>
<name>Maven Quick Start Archetype</name>
<url>http://maven.apache.org</url>
<dependencies>
<dependency>
<groupId>junit</groupId>
<artifactId>junit</artifactId>
<version>4.8.2</version>
<scope>test</scope>
</dependency>
</dependencies>
</project>
What did I just do?
You executed the Maven goal archetype:generate, and passed in various parameters to that goal. The prefix archetype is the plugin that contains the goal. If you are familiar with Ant, you may conceive of this as similar to a task. This goal created a simple project based upon an archetype. Suffice it to say for now that a plugin is a collection of goals with a general common purpose. For example the jboss-maven-plugin, whose purpose is "deal with various jboss items".
Build the Project
mvn package
The command line will print out various actions, and end with the following:
...
[INFO] ------------------------------------------------------------------------
[INFO] BUILD SUCCESSFUL
[INFO] ------------------------------------------------------------------------
[INFO] Total time: 2 seconds
[INFO] Finished at: Thu Jul 07 21:34:52 CEST 2011
[INFO] Final Memory: 3M/6M
[INFO] ------------------------------------------------------------------------
Unlike the first command executed (archetype:generate) you may notice the second is simply a single word - package. Rather than a goal, this is a phase. A phase is a step in the build lifecycle, which is an ordered sequence of phases. When a phase is given, Maven will execute every phase in the sequence up to and including the one defined. For example, if we execute the compile phase, the phases that actually get executed are:
- validate
- generate-sources
- process-sources
- generate-resources
- process-resources
- compile
You may test the newly compiled and packaged JAR with the following command:
java -cp target/my-app-1.0-SNAPSHOT.jar com.mycompany.app.App
Which will print the quintessential:
Hello World!
Maven Phases
Although hardly a comprehensive list, these are the most common default lifecycle phases executed.
- validate: validate the project is correct and all necessary information is available
- compile: compile the source code of the project
- test: test the compiled source code using a suitable unit testing framework. These tests should not require the code be packaged or deployed
- package: take the compiled code and package it in its distributable format, such as a JAR.
- integration-test: process and deploy the package if necessary into an environment where integration tests can be run
- verify: run any checks to verify the package is valid and meets quality criteria
- install: install the package into the local repository, for use as a dependency in other projects locally
- deploy: done in an integration or release environment, copies the final package to the remote repository for sharing with other developers and projects.
There are two other Maven lifecycles of note beyond the default list above. They are
- clean: cleans up artifacts created by prior builds
- site: generates site documentation for this project
Phases are actually mapped to underlying goals. The specific goals executed per phase is dependant upon the packaging type of the project. For example, package executes jar:jar if the project type is a JAR, and war:war is the project type is - you guessed it - a WAR.
An interesting thing to note is that phases and goals may be executed in sequence.
mvn clean dependency:copy-dependencies package
This command will clean the project, copy dependencies, and package the project (executing all phases up to package, of course).
Generating the Site
mvn site
This phase generates a site based upon information on the project's pom. You can look at the documentation generated under target/site.
Conclusion
We hope this quick overview has piqued your interest in the versitility of Maven. Note that this is a very truncated quick-start guide. Now you are ready for more comprehensive details concerning the actions you have just performed. Check out the Maven Getting Started Guide.
Commands to test the initial installation of Maven
mvn archetype:generate
creates a basic java project structure with a ‘HelloWorld’ app created
mvn archetype:generate -DgroupId=com.mycompany.app -DartifactId=my-app -DarchetypeArtifactId=maven-archetype-quickstart -DinteractiveMode=false
POM.XML
it will create the project build file ‘repo\my-app\pom.xml’
<project xmlns="http://maven.apache.org/POM/4.0.0"
xmlns:xsi="http://www.w3.org/2001/XMLSchema-instance"
xsi:schemaLocation="http://maven.apache.org/POM/4.0.0
http://maven.apache.org/xsd/maven-4.0.0.xsd">
<modelVersion>4.0.0</modelVersion>
<groupId>com.mycompany.app</groupId>
<artifactId>my-app</artifactId>
<packaging>jar</packaging>
<version>1.0-SNAPSHOT</version>
<name>Maven Quick Start Archetype</name>
<url>http://maven.apache.org</url>
<dependencies>
<dependency>
<groupId>junit</groupId>
<artifactId>junit</artifactId>
<version>3.8.1</version>
<scope>test</scope>
</dependency>
</dependencies>
</project>
This is a very simple POM but still displays the key elements every POM contains, so let's walk through each of them to familiarize you with the POM essentials:
- project This is the top-level element in all Maven pom.xml files.
- modelVersion This element indicates what version of the object model this POM is using. The version of the model itself changes very infrequently but it is mandatory in order to ensure stability of use if and when the Maven developers deem it necessary to change the model.
- groupId This element indicates the unique identifier of the organization or group that created the project. The groupId is one of the key identifiers of a project and is typically based on the fully qualified domain name of your organization. For example org.apache.maven.plugins is the designated groupId for all Maven plug-ins.
- artifactId This element indicates the unique base name of the primary artifact being generated by this project. The primary artifact for a project is typically a JAR file. Secondary artifacts like source bundles also use the artifactId as part of their final name. A typical artifact produced by Maven would have the form <artifactId>-<version>.<extension> (for example, myapp-1.0.jar).
- packaging This element indicates the package type to be used by this artifact (e.g. JAR, WAR, EAR, etc.). This not only means if the artifact produced is JAR, WAR, or EAR but can also indicate a specific lifecycle to use as part of the build process. (The lifecycle is a topic we will deal with further on in the guide. For now, just keep in mind that the indicated packaging of a project can play a part in customizing the build lifecycle.) The default value for the packaging element is JAR so you do not have to specify this for most projects.
- version This element indicates the version of the artifact generated by the project. Maven goes a long way to help you with version management and you will often see the SNAPSHOT designator in a version, which indicates that a project is in a state of development. We will discuss the use of snapshots and how they work further on in this guide.
- name This element indicates the display name used for the project. This is often used in Maven's generated documentation.
- url This element indicates where the project's site can be found. This is often used in Maven's generated documentation.
- description This element provides a basic description of your project. This is often used in Maven's generated documentation.
Project Structure
my-app
|-- pom.xml
`-- src
|-- main
| `-- java
| `-- com
| `-- mycompany
| `-- app
| `-- App.java
`-- test
`-- java
`-- com
`-- mycompany
`-- app
`-- AppTest.java
Compiling the project
Change to the directory where pom.xml is created by archetype:generate and execute the following command to compile your application sources:
mvn compile
mvn compile
Upon executing this command you should see output like the following:
[INFO] ----------------------------------------------------------------------------
[INFO] Building Maven Quick Start Archetype
[INFO] task-segment: [compile]
[INFO] ----------------------------------------------------------------------------
[INFO] artifact org.apache.maven.plugins:maven-resources-plugin: \
checking for updates from central
...
[INFO] artifact org.apache.maven.plugins:maven-compiler-plugin: \
checking for updates from central
...
[INFO] [resources:resources]
...
[INFO] [compiler:compile]
Compiling 1 source file to <dir>/my-app/target/classes
[INFO] ----------------------------------------------------------------------------
[INFO] BUILD SUCCESSFUL
[INFO] ----------------------------------------------------------------------------
[INFO] Total time: 3 minutes 54 seconds
[INFO] Finished at: Fri Sep 23 15:48:34 GMT-05:00 2005
[INFO] Final Memory: 2M/6M
[INFO] ----------------------------------------------------------------------------
Testing the project
Now you're successfully compiling your application's sources and now you've got some unit tests that you want to compile and execute (because every programmer always writes and executes their unit tests *nudge nudge wink wink*).
Execute the following command:
mvn test
mvn test
Upon executing this command you should see output like the following:
[INFO] ----------------------------------------------------------------------------
[INFO] Building Maven Quick Start Archetype
[INFO] task-segment: [test]
[INFO] ----------------------------------------------------------------------------
[INFO] artifact org.apache.maven.plugins:maven-surefire-plugin: \
checking for updates from central
...
[INFO] [resources:resources]
[INFO] [compiler:compile]
[INFO] Nothing to compile - all classes are up to date
[INFO] [resources:testResources]
[INFO] [compiler:testCompile]
Compiling 1 source file to C:\Test\Maven2\test\my-app\target\test-classes
...
[INFO] [surefire:test]
[INFO] Setting reports dir: C:\Test\Maven2\test\my-app\target/surefire-reports
-------------------------------------------------------
T E S T S
-------------------------------------------------------
[surefire] Running com.mycompany.app.AppTest
[surefire] Tests run: 1, Failures: 0, Errors: 0, Time elapsed: 0 sec
Results :
[surefire] Tests run: 1, Failures: 0, Errors: 0
[INFO] ----------------------------------------------------------------------------
[INFO] BUILD SUCCESSFUL
[INFO] ----------------------------------------------------------------------------
[INFO] Total time: 15 seconds
[INFO] Finished at: Thu Oct 06 08:12:17 MDT 2005
[INFO] Final Memory: 2M/8M
[INFO] ----------------------------------------------------------------------------
Some things to notice about the output:
- Maven downloads more dependencies this time. These are the dependencies and plugins necessary for executing the tests (it already has the dependencies it needs for compiling and won't download them again).
- Before compiling and executing the tests Maven compiles the main code (all these classes are up to date because we haven't changed anything since we compiled last).
If you simply want to compile your test sources (but not execute the tests), you can execute the following:
mvn test-compile
Now that you can compile your application sources, compile your tests, and execute the tests, you'll want to move on to the next logical step so you'll be asking ...
Creating a JAR and install it in the local repository
Making a JAR file is straight forward enough and can be accomplished by executing the following command:
mvn package
mvn package
If you take a look at the POM for your project you will notice the packaging element is set to jar. This is how Maven knows to produce a JAR file from the above command (we'll talk more about this later). You can now take a look in the ${basedir}/target directory and you will see the generated JAR file.
Now you'll want to install the artifact you've generated (the JAR file) in your local repository (~/.m2/repository is the default location). For more information on repositories you can refer to our Introduction to Repositories but let's move on to installing our artifact! To do so execute the following command:
mvn install
mvn install
Upon executing this command you should see the following output:
[INFO] ----------------------------------------------------------------------------
[INFO] Building Maven Quick Start Archetype
[INFO] task-segment: [install]
[INFO] ----------------------------------------------------------------------------
[INFO] [resources:resources]
[INFO] [compiler:compile]
Compiling 1 source file to <dir>/my-app/target/classes
[INFO] [resources:testResources]
[INFO] [compiler:testCompile]
Compiling 1 source file to <dir>/my-app/target/test-classes
[INFO] [surefire:test]
[INFO] Setting reports dir: <dir>/my-app/target/surefire-reports
-------------------------------------------------------
T E S T S
-------------------------------------------------------
[surefire] Running com.mycompany.app.AppTest
[surefire] Tests run: 1, Failures: 0, Errors: 0, Time elapsed: 0.001 sec
Results :
[surefire] Tests run: 1, Failures: 0, Errors: 0
[INFO] [jar:jar]
[INFO] Building jar: <dir>/my-app/target/my-app-1.0-SNAPSHOT.jar
[INFO] [install:install]
[INFO] Installing <dir>/my-app/target/my-app-1.0-SNAPSHOT.jar to \
<local-repository>/com/mycompany/app/my-app/1.0-SNAPSHOT/my-app-1.0-SNAPSHOT.jar
[INFO] ----------------------------------------------------------------------------
[INFO] BUILD SUCCESSFUL
[INFO] ----------------------------------------------------------------------------
[INFO] Total time: 5 seconds
[INFO] Finished at: Tue Oct 04 13:20:32 GMT-05:00 2005
[INFO] Final Memory: 3M/8M
[INFO] ----------------------------------------------------------------------------
Note that the surefire plugin (which executes the test) looks for tests contained in files with a particular naming convention. By default the tests included are:
- **/*Test.java
- **/Test*.java
- **/*TestCase.java
And the default excludes are:
- **/Abstract*Test.java
- **/Abstract*TestCase.java
You have walked through the process for setting up, building, testing, packaging, and installing a typical Maven project. This is likely the vast majority of what projects will be doing with Maven and if you've noticed, everything you've been able to do up to this point has been driven by an 18-line file, namely the project's model or POM. If you look at a typical Ant build file that provides the same functionality that we've achieved thus far you'll notice it's already twice the size of the POM and we're just getting started! There is far more functionality available to you from Maven without requiring any additions to our POM as it currently stands. To get any more functionality out of our example Ant build file you must keep making error-prone additions.
So what else can you get for free? There are a great number of Maven plug-ins that work out of the box with even a simple POM like we have above. We'll mention one here specifically as it is one of the highly prized features of Maven: without any work on your part this POM has enough information to generate a web site for your project! You will most likely want to customize your Maven site but if you're pressed for time all you need to do to provide basic information about your project is execute the following command:
mvn site
mvn site
There are plenty of other standalone goals that can be executed as well, for example:\
mvn clean
mvn clean
This will remove the target directory with all the build data before starting so that it is fresh.
Perhaps you'd like to generate an IntelliJ IDEA descriptor for the project?
mvn idea:idea
mvn idea:idea
This can be run over the top of a previous IDEA project - it will update the settings rather than starting fresh.
If you are using Eclipse IDE, just call:
mvn eclipse:eclipse
mvn eclipse:eclipse
Note: some familiar goals from Maven 1.0 are still there - such as jar:jar, but they might not behave like you'd expect. Presently, jar:jar will not recompile sources - it will simply just create a JAR from the target/classes directory, under the assumption everything else had already been done.
Using Plugins
Whenever you want to customise the build for a Maven project, this is done by adding or reconfiguring plugins.
Note for Maven 1.0 Users: In Maven 1.0, you would have added some preGoal to maven.xml and some entries to project.properties. Here, it is a little different.
For this example, we will configure the Java compiler to allow JDK 5.0 sources. This is as simple as adding this to your POM:
...
<build>
<plugins>
<plugin>
<groupId>org.apache.maven.plugins</groupId>
<artifactId>maven-compiler-plugin</artifactId>
<version>2.5.1</version>
<configuration>
<source>1.5</source>
<target>1.5</target>
</configuration>
</plugin>
</plugins>
</build>
...
You'll notice that all plugins in Maven 2.0 look much like a dependency - and in some ways they are. This plugin will be automatically downloaded and used - including a specific version if you request it (the default is to use the latest available).
The configuration element applies the given parameters to every goal from the compiler plugin. In the above case, the compiler plugin is already used as part of the build process and this just changes the configuration. It is also possible to add new goals to the process, and configure specific goals. For information on this, see the Introduction to the Build Lifecycle.
To find out what configuration is available for a plugin, you can see the Plugins List and navigate to the plugin and goal you are using. For general information about how to configure the available parameters of a plugin, have a look at the Guide to Configuring Plug-ins.
Adding other resources to the JAR file
Another common use case that can be satisfied which requires no changes to the POM that we have above is packaging resources in the JAR file. For this common task, Maven again relies on the Standard Directory Layout, which means by using standard Maven conventions you can package resources within JARs simply by placing those resources in a standard directory structure.
You see below in our example we have added the directory ${basedir}/src/main/resources into which we place any resources we wish to package in our JAR. The simple rule employed by Maven is this: any directories or files placed within the ${basedir}/src/main/resources directory are packaged in your JAR with the exact same structure starting at the base of the JAR.
my-app
|-- pom.xml
`-- src
|-- main
| |-- java
| | `-- com
| | `-- mycompany
| | `-- app
| | `-- App.java
| `-- resources
| `-- META-INF
| `-- application.properties
`-- test
`-- java
`-- com
`-- mycompany
`-- app
`-- AppTest.java
So you can see in our example that we have a META-INF directory with an application.properties file within that directory. If you unpacked the JAR that Maven created for you and took a look at it you would see the following:
|-- META-INF
| |-- MANIFEST.MF
| |-- application.properties
| `-- maven
| `-- com.mycompany.app
| `-- my-app
| |-- pom.properties
| `-- pom.xml
`-- com
`-- mycompany
`-- app
`-- App.class
As you can see, the contents of ${basedir}/src/main/resources can be found starting at the base of the JAR and our application.properties file is there in the META-INF directory. You will also notice some other files there like META-INF/MANIFEST.MF as well as a pom.xml and pom.properties file. These come standard with generation of a JAR in Maven. You can create your own manifest if you choose, but Maven will generate one by default if you don't. (You can also modify the entries in the default manifest. We will touch on this later.) The pom.xml and pom.properties files are packaged up in the JAR so that each artifact produced by Maven is self-describing and also allows you to utilize the metadata in your own application if the need arises. One simple use might be to retrieve the version of your application. Operating on the POM file would require you to use some Maven utilities but the properties can be utilized using the standard Java API and look like the following:
#Generated by Maven
#Tue Oct 04 15:43:21 GMT-05:00 2005
version=1.0-SNAPSHOT
groupId=com.mycompany.app
artifactId=my-app
To add resources to the classpath for your unit tests, you follow the same pattern as you do for adding resources to the JAR except the directory you place resources in is ${basedir}/src/test/resources. At this point you would have a project directory structure that would look like the following:
my-app
|-- pom.xml
`-- src
|-- main
| |-- java
| | `-- com
| | `-- mycompany
| | `-- app
| | `-- App.java
| `-- resources
| `-- META-INF
| |-- application.properties
`-- test
|-- java
| `-- com
| `-- mycompany
| `-- app
| `-- AppTest.java
`-- resources
`-- test.properties
In a unit test you could use a simple snippet of code like the following to access the resource required for testing:
...
// Retrieve resource
InputStream is = getClass().getResourceAsStream( "/test.properties" );
// Do something with the resource
...
Filtering resources Files
Sometimes a resource file will need to contain a value that can only be supplied at build time. To accomplish this in Maven, put a reference to the property that will contain the value into your resource file using the syntax ${<property name>}. The property can be one of the values defined in your pom.xml, a value defined in the user's settings.xml, a property defined in an external properties file, or a system property.
To have Maven filter resources when copying, simply set filtering to true for the resource directory in your pom.xml:
<project xmlns="http://maven.apache.org/POM/4.0.0"
xmlns:xsi="http://www.w3.org/2001/XMLSchema-instance"
xsi:schemaLocation="http://maven.apache.org/POM/4.0.0
http://maven.apache.org/xsd/maven-4.0.0.xsd">
<modelVersion>4.0.0</modelVersion>
<groupId>com.mycompany.app</groupId>
<artifactId>my-app</artifactId>
<version>1.0-SNAPSHOT</version>
<packaging>jar</packaging>
<name>Maven Quick Start Archetype</name>
<url>http://maven.apache.org</url>
<dependencies>
<dependency>
<groupId>junit</groupId>
<artifactId>junit</artifactId>
<version>3.8.1</version>
<scope>test</scope>
</dependency>
</dependencies>
<build>
<resources>
<resource>
<directory>src/main/resources</directory>
<filtering>true</filtering>
</resource>
</resources>
</build>
</project>
You'll notice that we had to add the build, resources, and resource elements which weren't there before. In addition, we had to explicitly state that the resources are located in the src/main/resources directory. All of this information was provided as default values previously, but because the default value for filtering is false, we had to add this to our pom.xml in order to override that default value and set filtering to true.
To reference a property defined in your pom.xml, the property name uses the names of the XML elements that define the value, with "pom" being allowed as an alias for the project (root) element. So ${pom.name} refers to the name of the project, ${pom.version} refers to the version of the project, ${pom.build.finalName} refers to the final name of the file created when the built project is packaged, etc. Note that some elements of the POM have default values, so don't need to be explicitly defined in your pom.xml for the values to be available here. Similarly, values in the user's settings.xml can be referenced using property names beginning with "settings" (for example, ${settings.localRepository} refers to the path of the user's local repository).
To continue our example, let's add a couple of properties to the application.properties file (which we put in the src/main/resources directory) whose values will be supplied when the resource is filtered:
# application.properties
application.name=${pom.name}
application.version=${pom.version}
With that in place, you can execute the following command (process-resources is the build lifecycle phase where the resources are copied and filtered):
mvn process-resources
mvn process-resources
and the application.properties file under target/classes (and will eventually go into the jar) looks like this:
# application.properties
application.name=Maven Quick Start Archetype
application.version=1.0-SNAPSHOT
To reference a property defined in an external file, all you need to do is add a reference to this external file in your pom.xml. First, let's create our external properties file and call it src/main/filters/filter.properties:
# filter.properties
my.filter.value=hello!
Next, we'll add a reference to this new file in the pom.xml:
<project xmlns="http://maven.apache.org/POM/4.0.0"
xmlns:xsi="http://www.w3.org/2001/XMLSchema-instance"
xsi:schemaLocation="http://maven.apache.org/POM/4.0.0
http://maven.apache.org/xsd/maven-4.0.0.xsd">
<modelVersion>4.0.0</modelVersion>
<groupId>com.mycompany.app</groupId>
<artifactId>my-app</artifactId>
<version>1.0-SNAPSHOT</version>
<packaging>jar</packaging>
<name>Maven Quick Start Archetype</name>
<url>http://maven.apache.org</url>
<dependencies>
<dependency>
<groupId>junit</groupId>
<artifactId>junit</artifactId>
<version>3.8.1</version>
<scope>test</scope>
</dependency>
</dependencies>
<build>
<filters>
<filter>src/main/filters/filter.properties</filter>
</filters>
<resources>
<resource>
<directory>src/main/resources</directory>
<filtering>true</filtering>
</resource>
</resources>
</build>
</project>
Then, if we add a reference to this property in the application.properties file:
# application.properties
application.name=${pom.name}
application.version=${pom.version}
message=${my.filter.value}
the next execution of the mvn process-resources command will put our new property value into application.properties. As an alternative to defining the my.filter.value property in an external file, you could also have defined it in the properties section of your pom.xml and you'd get the same effect (notice I don't need the references to src/main/filters/filter.properties either):
<project xmlns="http://maven.apache.org/POM/4.0.0"
xmlns:xsi="http://www.w3.org/2001/XMLSchema-instance"
xsi:schemaLocation="http://maven.apache.org/POM/4.0.0
http://maven.apache.org/xsd/maven-4.0.0.xsd">
<modelVersion>4.0.0</modelVersion>
<groupId>com.mycompany.app</groupId>
<artifactId>my-app</artifactId>
<version>1.0-SNAPSHOT</version>
<packaging>jar</packaging>
<name>Maven Quick Start Archetype</name>
<url>http://maven.apache.org</url>
<dependencies>
<dependency>
<groupId>junit</groupId>
<artifactId>junit</artifactId>
<version>3.8.1</version>
<scope>test</scope>
</dependency>
</dependencies>
<build>
<resources>
<resource>
<directory>src/main/resources</directory>
<filtering>true</filtering>
</resource>
</resources>
</build>
<properties>
<my.filter.value>hello</my.filter.value>
</properties>
</project>
Filtering resources can also get values from system properties; either the system properties built into Java (like java.version or user.home) or properties defined on the command line using the standard Java -D parameter. To continue the example, let's change our application.properties file to look like this:
# application.properties
java.version=${java.version}
command.line.prop=${command.line.prop}
Now, when you execute the following command (note the definition of the command.line.prop property on the command line), the application.properties file will contain the values from the system properties.
mvn process-resources
mvn process-resources "-Dcommand.line.prop=hello again"
Using External Dependencies
You've probably already noticed a dependencies element in the POM we've been using as an example. You have, in fact, been using an external dependency all this time, but here we'll talk about how this works in a bit more detail. For a more thorough introduction, please refer to our Introduction to Dependency Mechanism.
The dependencies section of the pom.xml lists all of the external dependencies that our project needs in order to build (whether it needs that dependency at compile time, test time, run time, or whatever). Right now, our project is depending on JUnit only (I took out all of the resource filtering stuff for clarity):
<project xmlns="http://maven.apache.org/POM/4.0.0"
xmlns:xsi="http://www.w3.org/2001/XMLSchema-instance"
xsi:schemaLocation="http://maven.apache.org/POM/4.0.0
http://maven.apache.org/xsd/maven-4.0.0.xsd">
<modelVersion>4.0.0</modelVersion>
<groupId>com.mycompany.app</groupId>
<artifactId>my-app</artifactId>
<version>1.0-SNAPSHOT</version>
<packaging>jar</packaging>
<name>Maven Quick Start Archetype</name>
<url>http://maven.apache.org</url>
<dependencies>
<dependency>
<groupId>junit</groupId>
<artifactId>junit</artifactId>
<version>3.8.1</version>
<scope>test</scope>
</dependency>
</dependencies>
</project>
For each external dependency, you'll need to define at least 4 things: groupId, artifactId, version, and scope. The groupId, artifactId, and version are the same as those given in the pom.xml for the project that built that dependency. The scope element indicates how your project uses that dependency, and can be values like compile, test, and runtime. For more information on everything you can specify for a dependency, see the Project Descriptor Reference.
For more information about the dependency mechanism as a whole, see Introduction to Dependency Mechanism.
With this information about a dependency, Maven will be able to reference the dependency when it builds the project. Where does Maven reference the dependency from? Maven looks in your local repository (~/.m2/repository is the default location) to find all dependencies. In a previous section, we installed the artifact from our project (my-app-1.0-SNAPSHOT.jar) into the local repository. Once it's installed there, another project can reference that jar as a dependency simply by adding the dependency information to its pom.xml:
<project xmlns="http://maven.apache.org/POM/4.0.0"
xmlns:xsi="http://www.w3.org/2001/XMLSchema-instance"
xsi:schemaLocation="http://maven.apache.org/POM/4.0.0
http://maven.apache.org/xsd/maven-4.0.0.xsd">
<groupId>com.mycompany.app</groupId>
<artifactId>my-other-app</artifactId>
...
<dependencies>
...
<dependency>
<groupId>com.mycompany.app</groupId>
<artifactId>my-app</artifactId>
<version>1.0-SNAPSHOT</version>
<scope>compile</scope>
</dependency>
</dependencies>
</project>
What about dependencies built somewhere else? How do they get into my local repository? Whenever a project references a dependency that isn't available in the local repository, Maven will download the dependency from a remote repository into the local repository. You probably noticed Maven downloading a lot of things when you built your very first project (these downloads were dependencies for the various plugins used to build the project). By default, the remote repository Maven uses can be found (and browsed) at http://repo.maven.apache.org/maven2/. You can also set up your own remote repository (maybe a central repository for your company) to use instead of or in addition to the default remote repository. For more information on repositories you can refer to the Introduction to Repositories.
Let's add another dependency to our project. Let's say we've added some logging to the code and need to add log4j as a dependency. First, we need to know what the groupId, artifactId, and version are for log4j. We can browse ibiblio and look for it, or use Google to help by searching for "site:www.ibiblio.org maven2 log4j". The search shows a directory called /maven2/log4j/log4j (or /pub/packages/maven2/log4j/log4j). In that directory is a file called maven-metadata.xml. Here's what the maven-metadata.xml for log4j looks like:
<metadata>
<groupId>log4j</groupId>
<artifactId>log4j</artifactId>
<version>1.1.3</version>
<versioning>
<versions>
<version>1.1.3</version>
<version>1.2.4</version>
<version>1.2.5</version>
<version>1.2.6</version>
<version>1.2.7</version>
<version>1.2.8</version>
<version>1.2.11</version>
<version>1.2.9</version>
<version>1.2.12</version>
</versions>
</versioning>
</metadata>
From this file, we can see that the groupId we want is "log4j" and the artifactId is "log4j". We see lots of different version values to choose from; for now, we'll just use the latest version, 1.2.12 (some maven-metadata.xml files may also specify which version is the current release version). Alongside the maven-metadata.xml file, we can see a directory corresponding to each version of the log4j library. Inside each of these, we'll find the actual jar file (e.g. log4j-1.2.12.jar) as well as a pom file (this is the pom.xml for the dependency, indicating any further dependencies it might have and other information) and another maven-metadata.xml file. There's also an md5 file corresponding to each of these, which contains an MD5 hash for these files. You can use this to authenticate the library or to figure out which version of a particular library you may be using already.
Now that we know the information we need, we can add the dependency to our pom.xml:
<project xmlns="http://maven.apache.org/POM/4.0.0"
xmlns:xsi="http://www.w3.org/2001/XMLSchema-instance"
xsi:schemaLocation="http://maven.apache.org/POM/4.0.0
http://maven.apache.org/xsd/maven-4.0.0.xsd">
<modelVersion>4.0.0</modelVersion>
<groupId>com.mycompany.app</groupId>
<artifactId>my-app</artifactId>
<version>1.0-SNAPSHOT</version>
<packaging>jar</packaging>
<name>Maven Quick Start Archetype</name>
<url>http://maven.apache.org</url>
<dependencies>
<dependency>
<groupId>junit</groupId>
<artifactId>junit</artifactId>
<version>3.8.1</version>
<scope>test</scope>
</dependency>
<dependency>
<groupId>log4j</groupId>
<artifactId>log4j</artifactId>
<version>1.2.12</version>
<scope>compile</scope>
</dependency>
</dependencies>
</project>
Now, when we compile the project (mvn compile), we'll see Maven download the log4j dependency for us.
How do I deploy my jar in my remote repository?
For deploying jars to an external repository, you have to configure the repository url in the pom.xml and the authentication information for connectiong to the repository in the settings.xml.
Here is an example using scp and username/password authentication:
<project xmlns="http://maven.apache.org/POM/4.0.0"
xmlns:xsi="http://www.w3.org/2001/XMLSchema-instance"
xsi:schemaLocation="http://maven.apache.org/POM/4.0.0
http://maven.apache.org/xsd/maven-4.0.0.xsd">
<modelVersion>4.0.0</modelVersion>
<groupId>com.mycompany.app</groupId>
<artifactId>my-app</artifactId>
<version>1.0-SNAPSHOT</version>
<packaging>jar</packaging>
<name>Maven Quick Start Archetype</name>
<url>http://maven.apache.org</url>
<dependencies>
<dependency>
<groupId>junit</groupId>
<artifactId>junit</artifactId>
<version>3.8.1</version>
<scope>test</scope>
</dependency>
<dependency>
<groupId>org.apache.codehaus.plexus</groupId>
<artifactId>plexus-utils</artifactId>
<version>1.0.4</version>
</dependency>
</dependencies>
<build>
<filters>
<filter>src/main/filters/filters.properties</filter>
</filters>
<resources>
<resource>
<directory>src/main/resources</directory>
<filtering>true</filtering>
</resource>
</resources>
</build>
<!--
|
|
|
-->
<distributionManagement>
<repository>
<id>mycompany-repository</id>
<name>MyCompany Repository</name>
<url>scp://repository.mycompany.com/repository/maven2</url>
</repository>
</distributionManagement>
</project>
<settings xmlns="http://maven.apache.org/SETTINGS/1.0.0"
xmlns:xsi="http://www.w3.org/2001/XMLSchema-instance"
xsi:schemaLocation="http://maven.apache.org/SETTINGS/1.0.0
http://maven.apache.org/xsd/settings-1.0.0.xsd">
...
<servers>
<server>
<id>mycompany-repository</id>
<username>jvanzyl</username>
<!-- Default value is ~/.ssh/id_dsa -->
<privateKey>/path/to/identity</privateKey> (default is ~/.ssh/id_dsa)
<passphrase>my_key_passphrase</passphrase>
</server>
</servers>
...
</settings>
Note that if you are connecting to an openssh ssh server which has the parameter "PasswordAuthentication" set to "no" in the sshd_confing, you will have to type your password each time for username/password authentication (although you can log in using another ssh client by typing in the username and password). You might want to switch to public key authentication in this case.
Care should be taken if using passwords in settings.xml. For more information, see Password Encryption.
How do I create documentation?
To get you jump started with Maven's documentation system you can use the archetype mechanism to generate a site for your existing project using the following command:
mvn archetype:generate \
-DarchetypeGroupId=org.apache.maven.archetypes \
-DarchetypeArtifactId=maven-archetype-site \
-DgroupId=com.mycompany.app \
-DartifactId=my-app-site
Now head on over to the Guide to creating a site to learn how to create the documentation for your project.
How do I build other types of projects?
Note that the lifecycle applies to any project type. For example, back in the base directory we can create a simple web application:
mvn archetype:generate \
-DarchetypeGroupId=org.apache.maven.archetypes \
-DarchetypeArtifactId=maven-archetype-webapp \
-DgroupId=com.mycompany.app \
-DartifactId=my-webapp
Note that these must all be on a single line. This will create a directory called my-webapp containing the following project descriptor:
<project xmlns="http://maven.apache.org/POM/4.0.0"
xmlns:xsi="http://www.w3.org/2001/XMLSchema-instance"
xsi:schemaLocation="http://maven.apache.org/POM/4.0.0
http://maven.apache.org/xsd/maven-4.0.0.xsd">
<modelVersion>4.0.0</modelVersion>
<groupId>com.mycompany.app</groupId>
<artifactId>my-webapp</artifactId>
<version>1.0-SNAPSHOT</version>
<packaging>war</packaging>
<dependencies>
<dependency>
<groupId>junit</groupId>
<artifactId>junit</artifactId>
<version>3.8.1</version>
<scope>test</scope>
</dependency>
</dependencies>
<build>
<finalName>my-webapp</finalName>
</build>
</project>
Note the <packaging> element - this tells Maven to build as a WAR. Change into the webapp project's directory and try:\
mvn clean package
mvn clean package
You'll see target/my-webapp.war is built, and that all the normal steps were executed.
How do I build more than one project at once?
The concept of dealing with multiple modules is built in to Maven 2.0. In this section, we will show how to build the WAR above, and include the previous JAR as well in one step.
Firstly, we need to add a parent pom.xml file in the directory above the other two, so it should look like this:
+- pom.xml
+- my-app
| +- pom.xml
| +- src
| +- main
| +- java
+- my-webapp
| +- pom.xml
| +- src
| +- main
| +- webapp
The POM file you'll create should contain the following:
<project xmlns="http://maven.apache.org/POM/4.0.0"
xmlns:xsi="http://www.w3.org/2001/XMLSchema-instance"
xsi:schemaLocation="http://maven.apache.org/POM/4.0.0
http://maven.apache.org/xsd/maven-4.0.0.xsd">
<modelVersion>4.0.0</modelVersion>
<groupId>com.mycompany.app</groupId>
<artifactId>app</artifactId>
<version>1.0-SNAPSHOT</version>
<packaging>pom</packaging>
<modules>
<module>my-app</module>
<module>my-webapp</module>
</modules>
</project>
We'll need a dependency on the JAR from the webapp, so add this to my-webapp/pom.xml:
...
<dependencies>
<dependency>
<groupId>com.mycompany.app</groupId>
<artifactId>my-app</artifactId>
<version>1.0-SNAPSHOT</version>
</dependency>
...
</dependencies>
Finally, add the following <parent> element to both of the other pom.xml files in the subdirectories:
<project xmlns="http://maven.apache.org/POM/4.0.0"
xmlns:xsi="http://www.w3.org/2001/XMLSchema-instance"
xsi:schemaLocation="http://maven.apache.org/POM/4.0.0
http://maven.apache.org/xsd/maven-4.0.0.xsd">
<parent>
<groupId>com.mycompany.app</groupId>
<artifactId>app</artifactId>
<version>1.0-SNAPSHOT</version>
</parent>
...
Now, try it... from the top level directory, run:
mvn clean install
mvn clean install
The WAR has now been created in my-webapp/target/my-webapp.war, and the JAR is included:
$ jar tvf my-webapp/target/my-webapp-1.0-SNAPSHOT.war
0 Fri Jun 24 10:59:56 EST 2005 META-INF/
222 Fri Jun 24 10:59:54 EST 2005 META-INF/MANIFEST.MF
0 Fri Jun 24 10:59:56 EST 2005 META-INF/maven/
0 Fri Jun 24 10:59:56 EST 2005 META-INF/maven/com.mycompany.app/
0 Fri Jun 24 10:59:56 EST 2005 META-INF/maven/com.mycompany.app/my-webapp/
3239 Fri Jun 24 10:59:56 EST 2005 META-INF/maven/com.mycompany.app/my-webapp/pom.xml
0 Fri Jun 24 10:59:56 EST 2005 WEB-INF/
215 Fri Jun 24 10:59:56 EST 2005 WEB-INF/web.xml
123 Fri Jun 24 10:59:56 EST 2005 META-INF/maven/com.mycompany.app/my-webapp/pom.properties
52 Fri Jun 24 10:59:56 EST 2005 index.jsp
0 Fri Jun 24 10:59:56 EST 2005 WEB-INF/lib/
2713 Fri Jun 24 10:59:56 EST 2005 WEB-INF/lib/my-app-1.0-SNAPSHOT.jar
How does this work? Firstly, the parent POM created (called app), has a packaging of pom and a list of modules defined. This tells Maven to run all operations over the set of projects instead of just the current one (to override this behaviour, you can use the --non-recursive command line option).
Next, we tell the WAR that it requires the my-app JAR. This does a few things: it makes it available on the classpath to any code in the WAR (none in this case), it makes sure the JAR is always built before the WAR, and it indicates to the WAR plugin to include the JAR in its library directory.
You may have noticed that junit-3.8.1.jar was a dependency, but didn't end up in the WAR. The reason for this is the <scope>test</scope> element - it is only required for testing, and so is not included in the web application as the compile time dependency my-app is.
The final step was to include a parent definition. This is different to the extend element you may be familiar with from Maven 1.0: this ensures that the POM can always be located even if the project is distributed separately from its parent by looking it up in the repository.
Unlike Maven 1.0, it is not required that you run install to successfully perform these steps - you can run package on its own and the artifacts in the reactor will be used from the target directories instead of the local repository.
You might like to generate your IDEA workspace again from the top level directory...
mvn idea:idea
mvn idea:idea
Created a batch file to handle Maven ‘mvn’ commands
maven_tools.cmd
|
@echo off set DEV_HOME=D:\Java set JAVA_HOME=%DEV_HOME%\java32\jdk6 set PATH=%JAVA_HOME%\bin;%PATH% set MAVEN_HOME=D:\xampp\maven set MAVEN_REPO_HOME=%MAVEN_HOME%\repo
:MENU echo ----------------------------- echo. echo APPNAME : %APPNAME% echo GROUPID : %GROUPID% echo JAVA_HOME : %JAVA_HOME% echo MAVEN_REPO_HOME : %MAVEN_REPO_HOME% echo PROJECT_HOME : %PROJECT_HOME% echo. echo ------------------------------ echo 1) mvn create app echo 1) mvn create app site docs echo 2) mvn compile echo 3) mvn package echo 4) mvn run echo 5) mvn clean echo 6) mvn renewdir echo 7) mvn test echo 8) mvn test-compile echo 9) mvn install echo 10) mvn site echo Press 1-9 or.. echo g for Go echo a for setting APPNAME (something-app) echo g for setting GROUPID (com.something.app) echo h for CD to %MAVEN_REPO_HOME% echo p for CD to Project %APPNAME% echo x for Exit set /p STATE= if "%STATE%" == "1" goto CREATEAPP if "%STATE%" == "11" goto CREATESITE if "%STATE%" == "2" goto COMPILE if "%STATE%" == "3" goto PACKAGE if "%STATE%" == "4" goto RUN if "%STATE%" == "6" goto RENEWDIR if "%STATE%" == "5" goto CLEAN if "%STATE%" == "7" goto TEST if "%STATE%" == "8" goto TEST-COMPILE if "%STATE%" == "9" goto INSTALL if "%STATE%" == "10" goto SITE if "%STATE%" == "a" goto NAMEAPP if "%STATE%" == "g" goto NAMEGROUPID if "%STATE%" == "h" goto REPOHOME if "%STATE%" == "p" goto PROJECTHOME
if "%STATE%" == "x" goto EXIT goto MENU
:NAMEAPP echo ENTER the AppName (i.e. silosix-app ) and press ENTER set /p APPNAME= echo NEW Application Name is %APPNAME% pause goto MENU
:NAMEGROUPID echo ENTER the GroupID (i.e. com.silosix.app ) and press ENTER set /p GROUPID= echo NEW GroupID is %GROUPID% pause goto MENU
:REPOHOME D: cd %REPO_HOME% goto MENU
:PROJECTHOME D: cd %REPO_HOME%\%APPNAME% goto MENU
:CREATEAPP echo ENTER the AppName (i.e. silosix-app ) and press ENTER set APPNAME=test-app set /p APPNAME= echo NEW Application Name is %APPNAME%
echo ENTER the GroupID (i.e. com.silosix.app ) and press ENTER set GROUPID=com.test.app set /p GROUPID= echo NEW GroupID is %GROUPID%
echo Ready to create the new project %GROUPID% %APPNAME%...Enter 'go' to proceed set /p ANSWER= if NOT "%ANSWER%"=="go" goto MENU
call mvn archetype:generate -DgroupId=%GROUPID% -DartifactId=%APPNAME% -DarchetypeArtifactId=maven-archetype-quickstart -DinteractiveMode=false copy maven_tools.cmd %APPNAME% echo DONE WITH CREATEx goto MENU
:CREATESITE echo ENTER the AppName (i.e. silosix-app ) and press ENTER set /p APPNAME= echo NEW Application Name is %APPNAME%
echo ENTER the GroupID (i.e. com.silosix.app ) and press ENTER set /p GROUPID= echo NEW GroupID is %GROUPID%
echo Ready to create the new project %GROUPID% %APPNAME%...Enter 'go' to proceed set /p ANSWER= if NOT "%ANSWER%"=="go" goto MENU
cd %APPNAME% call mvn archetype:generate -DarchetypeGroupId=org.apache.maven.archetypes -DarchetypeArtifactId=maven-archetype-site -DgroupId=%GROUPID% -DartifactId=%APPNAME%-site cd.. echo DONE WITH CREATE pause goto MENU
:COMPILE cd %APPNAME% call mvn compile cd.. pause goto MENU
:TEST cd %APPNAME% call MVN test cd.. pause goto MENU
:TEST-COMPILE cd %APPNAME% call mvn test-compile cd.. pause goto MENU
:INSTALL cd %APPNAME% call mvn install cd.. pause goto MENU
:PACKAGE cd %APPNAME% call mvn package cd.. pause goto MENU
:RUN echo ENTER the AppName (i.e. silosix-app ) and press ENTER set APPNAME=test-app set /p APPNAME= echo NEW Application Name is %APPNAME%
echo ENTER the GroupID (i.e. com.silosix.app ) and press ENTER set GROUPID=com.test.app set /p GROUPID= echo NEW GroupID is %GROUPID%
echo Ready to run the project %GROUPID% %APPNAME%...Enter 'go' to proceed set /p ANSWER= if NOT "%ANSWER%"=="go" goto MENU
call java -cp %APPNAME%/target/%APPNAME%-1.0-SNAPSHOT.jar %GROUPID%.App pause goto MENU
:CLEAN cd %APPNAME% mvn clean cd.. pause goto MENU
:SITE cd %APPNAME% mvn site cd.. pause goto MENU
:EXIT echo Exiting... |
Artifactory
Installation
- unzip the artifactory zipfile
- copy the /webapps/*.war file to tomcat\webapps\
- tomcat will automatically unpack and install into the ‘artifactory’ subdir
update xampp\tomcat\bin\setenv.bat
set ARTIFACTORY_HOME=D:\xampp\artifactory\.artifactory

Apache ANT ()
http://ant.apache.org/antlibs/proper.html
|
“ Binary downloads of the Ant build tool are available from http://ant.apache.org/. This manual assumes you are using Ant 1.8 or later. The instructions may also be compatible with other versions, but this has not been tested. Download and install Ant. Then, add the bin directory of the Ant distribution to your PATH environment variable, following the standard practices for your operating system platform. Once you have done this, you will be able to execute the ant shell command directly. “ |
The Short Story
|
To get up and running with the binary edition of Ant quickly, follow these steps:
Note that the links in the list above will give more details about each of the steps, should you need them. Or you can just continue reading the rest of this document. The short story for working with the Ant source code (not needed if you are working with the binary edition) is:
For the full story, continue reading.
|

|
Windows Note: |
|
|
|
The ant.bat script makes use of three environment variables - ANT_HOME, CLASSPATH and JAVA_HOME. Ensure that ANT_HOME and JAVA_HOME variables are set, and that they do not have quotes (either ' or ") and they do not end with \ or with /. CLASSPATH should be unset or empty. |
ANT_HOME Environment Variable
- ANT_HOME = D:\xampp\ant
D:\xampp\ant\bin>ant
Buildfile: build.xml does not exist!
Build failed
Apache Subversion ( SVN )
Current Version 1.7.8
BugZilla
copy bugzilla to ‘D:\xampp\bugzilla\bugzilla-4.2.5’
copy ‘D:\xampp\bugzilla\bugzilla-4.2.5’ to ‘D:\xampp\htdocs\bugzilla’
set PATH=%PATH%;D:\xampp\perl\bin
navigate to ‘D:\xampp\htdocs\bugzilla’
run ‘perl checksetup.pl’
COMMANDS TO INSTALL REQUIRED MODULES (You *must* run all these commands
and then re-run checksetup.pl):
D:\xampp\perl\bin\perl.exe install-module.pl Email::Send
D:\xampp\perl\bin\perl.exe install-module.pl Email::MIME
D:\xampp\perl\bin\perl.exe install-module.pl Math::Random::ISAAC
To attempt an automatic install of every required and optional module
with one command, do:
D:\xampp\perl\bin\perl.exe install-module.pl --all
cpan>
cpan>install Email::Send
cpan>install Email::MIME
cpan>install Math::Random::ISAAC
Failing due to no ‘make’ file
|
Make sure the path to perl has been defined in your Ikonboard's configuration.
once you have located the full perl module name to search for and the module is not in that list, follow the DB_File example below.
|

The above didn’t fix issue, couldn’t get PPM to conjure a program
Downloaded Strawberry 5.16.1
copied libexpat-1_dll to perl/perl/bin
able to run…..
CheckSetup to verify needed modules
checksetup.pl –check-modules
Should report to install modules:
D:\xampp\perl\bin\perl.exe install-module.pl Email::Send
D:\xampp\perl\bin\perl.exe install-module.pl Email::MIME
D:\xampp\perl\bin\perl.exe install-module.pl Math::Random::ISAAC
perl.exe checksetup.pl –check-modules
All OK?, Then.. This time, checksetup.pl should tell you that all the correct modules are installed and will display a message about, and write out a file called, localconfig. This file contains the default settings for a number of Bugzilla parameters.
perl.exe checksetup.pl
Should create a localconfig
localconfig
# What SQL database to use. Default is mysql. List of supported databases
# can be obtained by listing Bugzilla/DB directory - every module corresponds
# to one supported database and the name of the module (before ".pm")
# corresponds to a valid value for this variable.
$db_driver = 'mysql';
# The DNS name or IP address of the host that the database server runs on.
$db_host = 'localhost';
# The name of the database. For Oracle, this is the database's SID. For
# SQLite, this is a name (or path) for the DB file.
$db_name = 'bugs';
# Who we connect to the database as.
$db_user = 'bugs';
# Enter your database password here. It's normally advisable to specify
# a password for your bugzilla database user.
# If you use apostrophe (') or a backslash (\) in your password, you'll
# need to escape it by preceding it with a '\' character. (\') or (\)
# (It is far simpler to just not use those characters.)
$db_pass = 'bugs';
# Sometimes the database server is running on a non-standard port. If that's
# the case for your database server, set this to the port number that your
# database server is running on. Setting this to 0 means "use the default
# port for my database server."
$db_port = 3066;
Create DB with data from above, then retry:
perl.exe checksetup.pl
Reading ./localconfig...
OPTIONAL NOTE: If you want to be able to use the 'difference between two
patches' feature of Bugzilla (which requires the PatchReader Perl module
as well), you should install patchutils from:
http://cyberelk.net/tim/patchutils/
Checking for DBD-mysql (v4.001) ok: found v4.021
Checking for MySQL (v5.0.15) ok: found v5.5.27
WARNING: You need to set the max_allowed_packet parameter in your MySQL
configuration to at least 3276750. Currently it is set to 1048576.
You can set this parameter in the [mysqld] section of your MySQL
configuration file.
Adding new table bz_schema...
Initializing bz_schema...
Creating tables...
Converting attach_data maximum size to 100G...
Setting up choices for standard drop-down fields:
priority bug_status rep_platform resolution bug_severity op_sys
Creating ./data directory...
Creating ./data/attachments directory...
Creating ./data/db directory...
Creating ./data/extensions directory...
Creating ./data/mining directory...
Creating ./data/webdot directory...
Creating ./graphs directory...
Creating ./skins/custom directory...
Creating ./data/extensions/additional...
Creating ./data/mailer.testfile...
Creating ./Bugzilla/.htaccess...
Creating ./data/.htaccess...
Creating ./data/attachments/.htaccess...
Creating ./data/webdot/.htaccess...
Creating ./graphs/.htaccess...
Creating ./lib/.htaccess...
Creating ./template/.htaccess...
Creating contrib/.htaccess...
Creating t/.htaccess...
Creating xt/.htaccess...
Bugzilla requires an SMTP server to function on Windows.
Please enter your SMTP server's hostname: localhost
Precompiling templates...done.
Initializing "Dependency Tree Changes" email_setting ...
Marking closed bug statuses as such...
Creating default classification 'Unclassified'...
Setting up foreign keys...
Setting up the default status workflow...
Creating default groups...
Setting up user preferences...
Looks like we don't have an administrator set up yet. Either this is
your first time using Bugzilla, or your administrator's privileges
might have accidentally been deleted.
Enter the e-mail address of the administrator: novus6@yahoo.com
Enter the real name of the administrator: Novus6
Enter a password for the administrator account: admins
AddUser
SiloSix / silosix
DB read
Added bugs2 / bugs2 user for the DB and retried
data/params not found, though it exists in \xampp\htdocs\bugzilla\data\params
had two instances of Bugzilla:
/xampp/bugzilla
/xampp/htdocs/bugzilla/
working off the htdocs now and getting errors after running
perl checksetup.pl –check-modules
perl checksetup.pl

/bugzilla
Software error:
install_driver(mysql) failed: Can't load 'D:/xampp/perl/perl/vendor/lib/auto/DBD/mysql/mysql.dll' for module DBD::mysql: load_file:The specified module could not be found at D:/xampp/perl/perl/lib/DynaLoader.pm line 190.
at (eval 1017) line 3.
Compilation failed in require at (eval 1017) line 3.
Perhaps a required shared library or dll isn't installed where expected
at Bugzilla/DB.pm line 1284.
ran the following as a last-ditch effort
perl checksetup.pl --all

libmysql_.dll
D:\xampp\perl\perl\vendor\lib\auto\DBD\mysql\libmysql_.dll
put libmysql_dll in a bunch of places
\perl\perl\vendor\lib\auto\DBD\mysql\
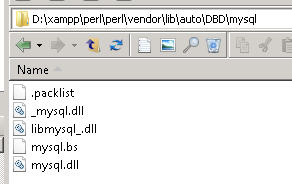

Reports Option (libgd-2.dll)
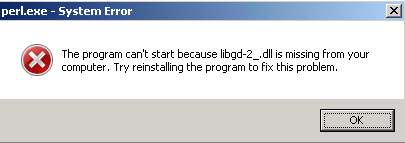
run ‘cpan .’ to build the module to perl/bin/site
Open a Shell from XAMPP
navigate to D:\xampp\htdocs\bugzilla
BugZilla Install Attempt 2
Strawberry Perl or Active Perl
Download and install perl to /xampp/perl
httpd.conf updates for bugzilla
Add settings for bugzilla
tell apache to look to the registry for the perl path/command string
# BugZilla
#
# This should be changed to whatever you set DocumentRoot to.
#
<Directory "D:/xampp/htdocs/bugzilla">
#
# Possible values for the Options directive are "None", "All",
# or any combination of:
# Indexes Includes FollowSymLinks SymLinksifOwnerMatch ExecCGI MultiViews
#
# Note that "MultiViews" must be named *explicitly* --- "Options All"
# doesn't give it to you.
#
# The Options directive is both complicated and important. Please see
# http://httpd.apache.org/docs-2.0/mod/core.html#options
# for more information.
#
Options Indexes FollowSymLinks ExecCGI
#
# AllowOverride controls what directives may be placed in .htaccess files.
# It can be "All", "None", or any combination of the keywords:
# Options FileInfo AuthConfig Limit
#
AllowOverride All
#
# Controls who can get stuff from this server.
#
Order allow,deny
Allow from all
#
# Tell Apache to use Perl to execute .cgi
#
ScriptInterpreterSource Registry-Strict
</Directory>
<Directory htdocs/bugzilla>
AddHandler cgi-script .cgi
Options +Indexes +ExecCGI
DirectoryIndex index.cgi
AllowOverride Limit FileInfo Indexes
</Directory>
PERL CHECKSETUP.PL
Run checksetup.pl –check-modules to verify installed components
perl checksetup.pl –check-modules
perl install-module.pl <class>::<component>
Update Required Modeules Modules
D:\xampp\perl\bin\perl.exe install-module.pl Email::Send
D:\xampp\perl\bin\perl.exe install-module.pl Email::MIME
D:\xampp\perl\bin\perl.exe install-module.pl Math::Random::ISAAC
PERL CHECKSETUP.PL
Run checksetup.pl –check-modules to verify installed components
perl checksetup.pl –check-modules
http://localhost:81/bugzilla/
Software error:
The ./data/params file does not exist. You probably need to run checksetup.pl. at Bugzilla/Config.pm line 337.
Compilation failed in require at D:/xampp/htdocs/bugzilla/index.cgi line 34.
BEGIN failed--compilation aborted at D:/xampp/htdocs/bugzilla/index.cgi line 34.
perl checksetup.pl
Reading ./localconfig...
OPTIONAL NOTE: If you want to be able to use the 'difference between two
patches' feature of Bugzilla (which requires the PatchReader Perl module
as well), you should install patchutils from:
http://cyberelk.net/tim/patchutils/
This version of Bugzilla contains some variables that you may want to
change and adapt to your local settings. The following variables are
new to ./localconfig since you last ran checksetup.pl:
create_htaccess, webservergroup, use_suexec, db_driver, db_host,
db_name, db_user, db_pass, db_port, db_sock, db_check, index_html,
cvsbin, interdiffbin, diffpath, site_wide_secret
Please edit the file ./localconfig and then re-run checksetup.pl
to complete your installation.
/bugzilla/localconfig
# What SQL database to use. Default is mysql. List of supported databases
# can be obtained by listing Bugzilla/DB directory - every module corresponds
# to one supported database and the name of the module (before ".pm")
# corresponds to a valid value for this variable.
$db_driver = 'mysql';
# The DNS name or IP address of the host that the database server runs on.
$db_host = 'localhost';
# The name of the database. For Oracle, this is the database's SID. For
# SQLite, this is a name (or path) for the DB file.
$db_name = 'bugs';
# Who we connect to the database as.
$db_user = 'bugs';
# Enter your database password here. It's normally advisable to specify
# a password for your bugzilla database user.
# If you use apostrophe (') or a backslash (\) in your password, you'll
# need to escape it by preceding it with a '\' character. (\') or (\)
# (It is far simpler to just not use those characters.)
$db_pass = 'bugs';
# Sometimes the database server is running on a non-standard port. If that's
# the case for your database server, set this to the port number that your
# database server is running on. Setting this to 0 means "use the default
# port for my database server."
$db_port = 3306;
perl checksetup.pl
Reading ./localconfig...
OPTIONAL NOTE: If you want to be able to use the 'difference betw
patches' feature of Bugzilla (which requires the PatchReader Perl
as well), you should install patchutils from:
http://cyberelk.net/tim/patchutils/
Checking for DBD-mysql (v4.001) ok: found v4.021
Checking for MySQL (v5.0.15) ok: found v5.5.27
WARNING: You need to set the max_allowed_packet parameter in your
configuration to at least 3276750. Currently it is set to 1048576
You can set this parameter in the [mysqld] section of your MySQL
configuration file.
Creating ./data directory...
Creating ./data/attachments directory...
Creating ./data/db directory...
Creating ./data/extensions directory...
Creating ./data/mining directory...
Creating ./data/webdot directory...
Creating ./graphs directory...
Creating ./skins/custom directory...
Creating ./data/extensions/additional...
Creating ./data/mailer.testfile...
Creating ./Bugzilla/.htaccess...
Creating ./data/.htaccess...
Creating ./data/attachments/.htaccess...
Creating ./data/webdot/.htaccess...
Creating ./graphs/.htaccess...
Creating ./lib/.htaccess...
Creating ./template/.htaccess...
Creating contrib/.htaccess...
Creating t/.htaccess...
Creating xt/.htaccess...
Bugzilla requires an SMTP server to function on Windows.
Please enter your SMTP server's hostname:localhost
Precompiling templates...done.
Now that you have installed Bugzilla, you should visit the 'Param
page (linked in the footer of the Administrator account) to ensur
is set up as you wish - this includes setting the 'urlbase' optio
the correct URL.
checksetup.pl complete.
libmysql_dll
D:\xampp\perl\perl\vendor\lib\auto\DBD\mysql

libgd-2.dll ( Reports Option )
libgd-2.dll (Reports Option Error )
D:\xampp\perl\perl\vendor\lib\auto\GD\libgd-2.dll
bugzilla/data/params
%param = (
'LDAPBaseDN' => '',
'LDAPbinddn' => '',
'LDAPfilter' => '',
'LDAPmailattribute' => 'mail',
'LDAPserver' => '',
'LDAPstarttls' => 0,
'LDAPuidattribute' => 'uid',
'RADIUS_NAS_IP' => '',
'RADIUS_email_suffix' => '',
'RADIUS_secret' => '',
'RADIUS_server' => '',
'ajax_user_autocompletion' => '1',
'allow_attachment_deletion' => 0,
'allow_attachment_display' => 0,
'allowbugdeletion' => 0,
'allowemailchange' => 1,
'allowuserdeletion' => 0,
'announcehtml' => 'SiloSix AnounceHTML ',
'attachment_base' => '',
'auth_env_email' => '',
'auth_env_id' => '',
'auth_env_realname' => '',
'bonsai_url' => '',
'chartgroup' => 'editbugs',
'commentonchange_resolution' => 0,
'commentonduplicate' => 0,
'confirmuniqueusermatch' => 1,
'cookiedomain' => '',
'cookiepath' => '/',
'createemailregexp' => '.*',
'cvsroot' => '',
'cvsroot_get' => '',
'debug_group' => 'admin',
'default_search_limit' => '500',
'defaultopsys' => 'Windows',
'defaultplatform' => 'PC',
'defaultpriority' => '---',
'defaultquery' => 'resolution=---&emailassigned_to1=1&emailassigned_to2=1&emailreporter2=1&emailcc2=1&emailqa_contact2=1&emaillongdesc3=1&order=Importance&long_desc_type=substring',
'defaultseverity' => 'enhancement',
'docs_urlbase' => 'docs/%lang%/html/',
'duplicate_or_move_bug_status' => 'RESOLVED',
'emailregexp' => '^[\\w\\.\\+\\-=]+@[\\w\\.\\-]+\\.[\\w\\-]+$',
'emailregexpdesc' => 'A legal address must contain exactly one \'@\', and at least one \'.\' after the @.',
'emailsuffix' => '',
'globalwatchers' => '',
'inbound_proxies' => '',
'insidergroup' => '',
'letsubmitterchoosemilestone' => 1,
'letsubmitterchoosepriority' => 1,
'lxr_root' => '',
'lxr_url' => '',
'mail_delivery_method' => 'SMTP',
'mailfrom' => 'bugzilla-daemon',
'maintainer' => 'novus6@yahoo.com',
'makeproductgroups' => 0,
'max_search_results' => '10000',
'maxattachmentsize' => '1000',
'maxlocalattachment' => '0',
'maxusermatches' => '1000',
'mostfreqthreshold' => '2',
'musthavemilestoneonaccept' => 0,
'mybugstemplate' => 'buglist.cgi?resolution=---&emailassigned_to1=1&emailreporter1=1&emailtype1=exact&email1=%userid%',
'noresolveonopenblockers' => 0,
'password_complexity' => 'no_constraints',
'proxy_url' => '',
'querysharegroup' => 'editbugs',
'quip_list_entry_control' => 'open',
'rememberlogin' => 'on',
'requirelogin' => '0',
'search_allow_no_criteria' => 1,
'shadowdb' => '',
'shadowdbhost' => '',
'shadowdbport' => '3306',
'shadowdbsock' => '',
'shutdownhtml' => '',
'smtp_debug' => 0,
'smtp_password' => 'admin',
'smtp_username' => 'admin',
'smtpserver' => 'localhost',
'ssl_redirect' => 0,
'sslbase' => 'https://e6510vm:444/bugzilla/',
'strict_isolation' => 0,
'strict_transport_security' => 'off',
'timetrackinggroup' => 'editbugs',
'upgrade_notification' => 'latest_stable_release',
'urlbase' => 'http://e6510vm/bugzilla/',
'use_mailer_queue' => 0,
'use_see_also' => 1,
'usebugaliases' => 0,
'useclassification' => 0,
'usemenuforusers' => '0',
'useqacontact' => 0,
'user_info_class' => 'CGI',
'user_verify_class' => 'DB',
'usestatuswhiteboard' => 0,
'usetargetmilestone' => 0,
'usevisibilitygroups' => 0,
'utf8' => 1,
'webdotbase' => 'http://www.research.att.com/~north/cgi-bin/webdot.cgi/%urlbase%',
'whinedays' => 7
);
bugzilla/localconfig
# If you are using Apache as your web server, Bugzilla can create .htaccess
# files for you, which will keep this file (localconfig) and other
# confidential files from being read over the web.
#
# If this is set to 1, checksetup.pl will create .htaccess files if
# they don't exist.
#
# If this is set to 0, checksetup.pl will not create .htaccess files.
$create_htaccess = 1;
# The name of the group that your web server runs as. On Red Hat
# distributions, this is usually "apache". On Debian/Ubuntu, it is
# usually "www-data".
#
# If you have use_suexec turned on below, then this is instead the name
# of the group that your web server switches to to run cgi files.
#
# If this is a Windows machine, ignore this setting, as it does nothing.
#
# If you do not have access to the group your scripts will run under,
# set this to "". If you do set this to "", then your Bugzilla installation
# will be _VERY_ insecure, because some files will be world readable/writable,
# and so anyone who can get local access to your machine can do whatever they
# want. You should only have this set to "" if this is a testing installation
# and you cannot set this up any other way. YOU HAVE BEEN WARNED!
#
# If you set this to anything other than "", you will need to run checksetup.pl
# as Administrator or as a user who is a member of the specified group.
$webservergroup = '';
# Set this to 1 if Bugzilla runs in an Apache SuexecUserGroup environment.
#
# If your web server runs control panel software (cPanel, Plesk or similar),
# or if your Bugzilla is to run in a shared hosting environment, then you are
# almost certainly in an Apache SuexecUserGroup environment.
#
# If this is a Windows box, ignore this setting, as it does nothing.
#
# If set to 0, checksetup.pl will set file permissions appropriately for
# a normal webserver environment.
#
# If set to 1, checksetup.pl will set file permissions so that Bugzilla
# works in a SuexecUserGroup environment.
$use_suexec = 0;
# What SQL database to use. Default is mysql. List of
$db_driver = 'mysql';
$db_host = 'localhost';
$db_name = 'bugs';
$db_user = 'bugs';
$db_pass = 'bugs';
$db_port = 3306;
# MySQL Only: Enter a path to the unix socket for MySQL. If this is
# blank, then MySQL's compiled-in default will be used. You probably
# want that.
$db_sock = '';
# Should checksetup.pl try to verify that your database setup is correct?
# With some combinations of database servers/Perl modules/moonphase this
# doesn't work, and so you can try setting this to 0 to make checksetup.pl
# run.
$db_check = 1;
# Most web servers will allow you to use index.cgi as a directory
# index, and many come preconfigured that way, but if yours doesn't
# then you'll need an index.html file that provides redirection
# to index.cgi. Setting $index_html to 1 below will allow
# checksetup.pl to create an index.html for you if it doesn't exist.
# NOTE: checksetup.pl will not replace an existing file, so if you
# wish to have checksetup.pl create one for you, you must
# make sure that index.html doesn't already exist.
$index_html = 0;
# If you want to use the CVS integration of the Patch Viewer, please specify
# the full path to the "cvs" executable here.
$cvsbin = '';
# If you want to use the "Difference Between Two Patches" feature of the
# Patch Viewer, please specify the full path to the "interdiff" executable
# here.
$interdiffbin = '';
# For the "Difference Between Two Patches" feature to work, we need to know
# what directory the "diff" bin is in. (You only need to set this if you
# are using that feature of the Patch Viewer.)
$diffpath = '.';
# This secret key is used by your installation for the creation and
# validation of encrypted tokens. These tokens are used to implement
# security features in Bugzilla, to protect against certain types of attacks.
# A random string is generated by default. It's very important that this key
# is kept secret. It also must be very long.
$site_wide_secret = 'Szkde7sYV9bm8eHdRphRPlsfzmYkFk8DWnCazZIAniUMblheFz4NCYe14X2TdCVX';
BugZilla Application
STUCK HERE
libXpm_.dll ( reports OPTION ERror )

VisualSVN Server 2.5.8 Setup
NOTE:
VisualSVN will listen on port 443 so XAMPP will need to be configured for another port.
- xampp/apache/conf/extra/httpd-ssl.conf
# Had to change ssl port from port 443 to 444 since VisualSVN Server consumes this port and
# it can't be changed
#Listen 443
Listen 444

Installation


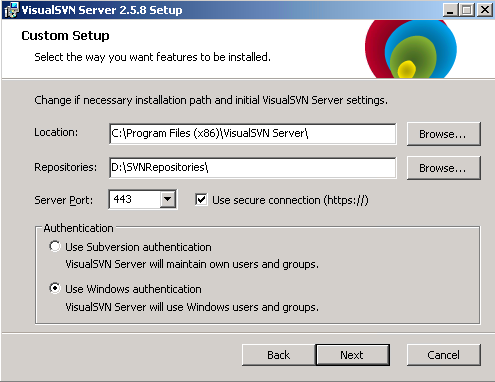


Main Screen

Disk Cleanup


Changing the Server’s Name, Repository Location, and URL
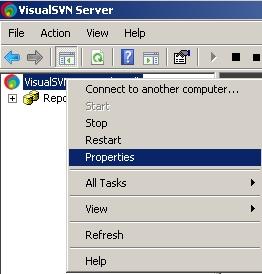
General

Network
Setup the server name here.
It can be different than the Windows PC Name, BUT the hosts file MUST BE EDITED to redirect to either the system’s IP ADDRESS or host name of the computer.
In this case, the NetBIOS name of the Host computer was used since its IP address is dynamically assigned.
use ‘ipconfig /flushdns’ to clean out existing routes so the changes will take place without a need to reboot
If the page is already loaded in a browser, hold CTRL when clicking the refresh button (CTRL-F5).
Hosts Example
# 127.0.0.1 localhost
# ::1 localhost
192.168.0.29 svn
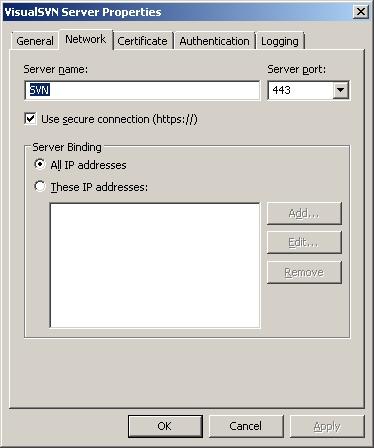
Certificate

Authentication

Logging

Changing the Server’s Certificate


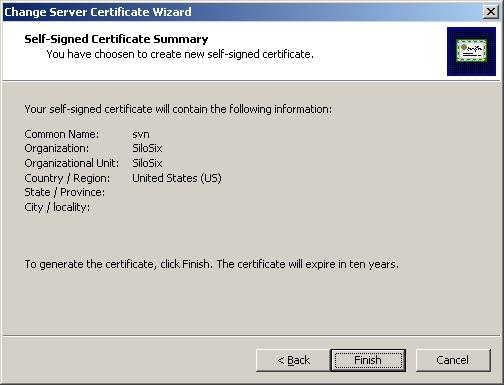
Adding Servers to HOSTS file
- It can be different than the Windows PC Name, BUT the hosts file MUST BE EDITED to redirect to the system’s IP ADDRESS
- use ‘ipconfig /flushdns’ to clean out existing routes so the changes will take place without a need to reboot
- If the page is already loaded in a browser, hold CTRL when clicking the refresh button (CTRL-F5).
Change hosts file
# For example:
#
# 102.54.94.97 rhino.acme.com # source server
# 38.25.63.10 x.acme.com # x client host
# localhost name resolution is handled within DNS itself.
# 127.0.0.1 localhost
# ::1 localhost
192.168.0.29 svn
Flush the DNS after changing the hosts file
C:\Windows\System32\drivers\etc>ipconfig /flushdns
Windows IP Configuration
Successfully flushed the DNS Resolver Cache.
Accessing the VisualSVN Server Remotely in Browser

Tortoise SVN
Installatoin

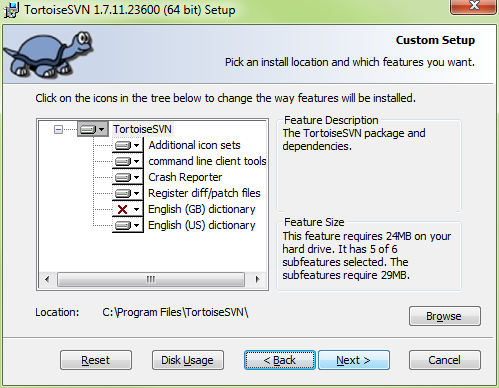
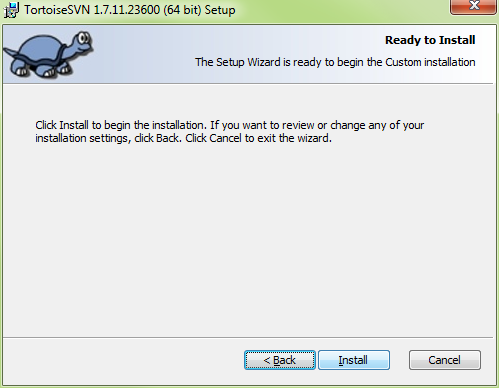


Repo Browser
Windows 98SE Virtualization
- Windows 98SE has not $ADMIN share and so VM Workstation or VM Converter Standalone cannot create a VM from physical machine.
- Create an Acronis True Backup recovery CD
- Boot with the recovery CD to archive the Target system
- Best to create the *.tib image over the LAN on the VM system
- Use VMWare Converter Standalone to create a VM from the TIB backup
- Add a CDROM device to the VM for the System’s physical CDROM drive
- Add a CDROM device to the VM for the Windows98SE CD-ROM. This will be required for installing drivers on the first boot up.
- Add a CDROM device for the VMWare Tools
- VMWare Tools will need to be installed on the VM for VGA graphics and other system devices to work properly.
- \\E6510\c$\Program Files (x86)\VMware\VMware Workstation\winPre2k.iso
- Might need to open the iso file in 7ZIP and copy the contents directly to the VM
- Having issues with VGA monitor resolution; stuck at 640x480
Changing the Graphics Adapter
- Right-Click the desktop
- Select Properties\Setttings


- Click Advanced…
- Go to Adapter TAB
- Click Change… button

- Click Next

Select “Display a list of all the drivers in a specific location, so you can select the driver you want

Click ‘Have Disk…’

- Drill down to ‘C:\Program Files\VMWare\Drivers\video\vmx_svga.inf’
- Click OK

- A reboot MAY be required
- Screen Area should have values beyond the 640x480 option
- Colors should also allow ‘True Color (32bit)
- Click Apply, verify the adjustment works correctly
- Click OK
- Restart VM
- THEN BACK IT UP!!!!
VM Disk Maintenance
- Clean Up Disks: remove unused files ( a la ‘Empty Recycle Bin’ )

Ubuntu 12.10 VM Creation
- Create new VM with Blank Virtual Disk


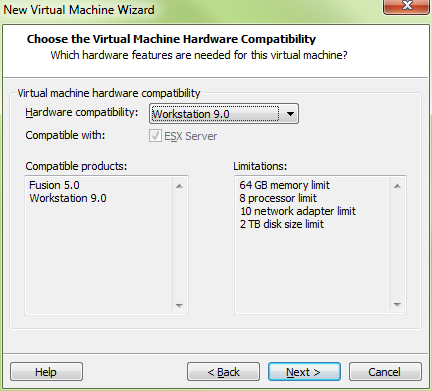

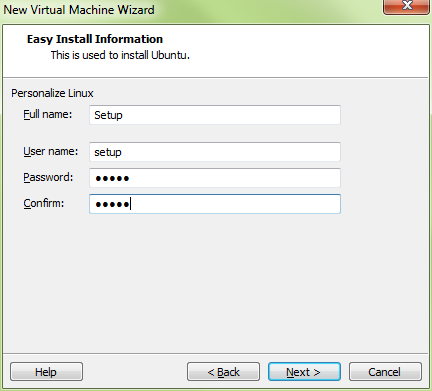


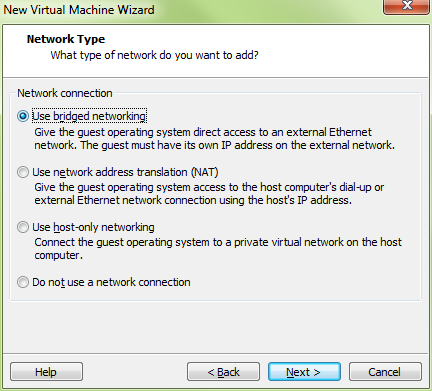


Summary

Customize Hardware
- Create new CDROM device (might prompt automatically)
- Select ‘Use ISO image file’ and assign it to the Ubuntu installer ISO file

Configure Virtual Network Adapter

VMWare Support KBs
Configuring the SVGA video driver on older versions of Windows virtual machines (1001819)
Windows 95
To install the SVGA driver:
- After installing VMware Tools, click Finish.
The Display Settings dialog box appears. - Click the Advanced Properties button.
The Advanced Display Properties dialog box appears. - Click the Change button.
The Select Device dialog box appears. - Select Have Disk.
- Enter this following path and click OK:
C:\Program Files\VMware\VMware Tools\Drivers\video - Click OK again to install the driver.
- Click Close from the Advanced Display Properties dialog box and click Close from the Display Setting dialog box.
- Click Yes to restart Windows 95 and start using the new video driver.
Note: You must set your resolution to 1024 x 768 in the display settings as they remain at 640 x 480 after the reboot.
Enable Networking After Installing Windows 98
If networking was disabled at the time you installed Windows 98, you can enable it after the operating system has been installed.
Installation Steps
- Power off the virtual machine.
- Add a network adapter to the configuration.
- Power on the virtual machine.
Windows 98 automatically detects an AMD PCNET Family Ethernet Adapter (PCI-ISA) and prompts the Windows 98 CD-ROM to install drivers. The default Ethernet adapter settings typically do not need to be changed. - (Optional) You can use the Network icon in the Windows 98 Control Panel to view or change network settings.
For example, you might want to add the TCP/IP protocol since Windows 98 does not install it by default.
VMWare EasY Install Information
Providing Easy Install Information
When the New Virtual Wizard detects an operating system that supports Easy Install, the wizard prompts you for information about the guest operating system. After the virtual machine is created, the guest operating system installation is automated and VMware Tools is installed.
For Windows guest operating systems, you must provide the following Easy Install information.
For Linux guest operating systems, you must provide the following Easy Install information.
SOAPUI


LOADUI


Windows 7 WINS Server
Windows Remote Server Administration Tools - http://www.microsoft.com/en-us/download/details.aspx?id=7887
Installing Remote Server Administration Tools
InstructionsInstalling Remote Server Administration Tools for Windows 7 with SP1 Additional informationFor more information about Remote Server Administration Tools for Windows 7 with SP1, see the Remote Server Administration Tools for Windows 7 Help on the Windows Server TechCenter.
|
Install WINS

Installing Remote Server Administration Tools


Configure WINS
END
|
|
XXX
- Log in to post comments